
DIY

Easy DIY Macrame Plant Hanger
Step 1 – Pick Your Planter
In order to make your macrame plant hanger the right size, you’ll want to first know what size planter it is required to hold. Plastic planters are lighter, but your plant holder can handle metal, wood, or ceramic planters too. Just make sure your drain tray is sufficient to keep water from running onto the ground. Give your planter a fresh coat of paint if needed. Then go ahead and place your plant into the pot with good soil.

Step 2 – Cut the Macrame Cord
You can choose from a variety of thicknesses for your natural macrame cord. The 3mm thickness will hold up well, but you can go ultra-durable with a four, five, or six millimeter thickness. Just make sure the roll you buy at the local craft store or online is at least 100 feet long. Cut your macrame cord into eight, ten-foot strands. You can get away with shorter strands for smaller pots.
Step 3 – Begin the Process
To start, loop the strands over the edge of the ring. This will provide you with 16 strands hanging down. Take an additional piece of cord that’s a few feet long and wind it around the group of strands directly below the ring where they overlap. Tie it into a macrame wrapped knot.
Step 4 – Divide Your Strands
With the ring mount secure, you will now separate the 16 strands into four groups. Each of these groups will run down the four sides of the planter, meeting underneath.
Step 5 – Make Square Knots
From your wrapped knot, measure down each group of four strands and mark a spot about 20 inches down. At this spot, use the two outside strands to tie a square knot over the two inside strands. Make a second square knot next to the first.
Step 6 – Make Next Round of Square Knots

Measure down from the bottom of the square knots you just made. Mark a spot around four to six inches down on all of the 16 strands so the next knots are even. Choose a length that makes sense for your planter size.From there, create four more square knots, by taking the center and left strands from one group and tying them to the center and right strands of the adjacent group. Tie a second set of square knots directly below the first.
Step 7 – Make a Final Knot
Once you have all of your square knots completed, gather together the bottoms of the strand groups and tie them all into one knot five to eight inches below the last knots. Trim up any uneven strands at the bottom and you’re done.
Step 8 – Insert Plant and Hang
Now comes the rewarding part. Your hanger is complete, so it’s time to display your plant. If you don’t already have a plant hook in the ceiling, install one now. For drywall, be sure to use a hook with a bracket that expands on the other side. Otherwise, insert your hook into a stud. Place your planter inside the macrame hanger with the big knot directly below the bottom of the planter and the four knotted strands going up the sides. Rearrange the leaves or branches so they are evenly spaced around the hanger straps. Using a securely placed ladder or step stool, hang your plant hanger from the ceiling hook and sit back to enjoy your efforts.
Tip: If you want your hanger to hang lower, add an S-hook of any length to the top of the ring. You can also simply use macrame cord tied around the top of the ring as well as the ceiling hook.
Article by Dawn Hammon at doityourself.com
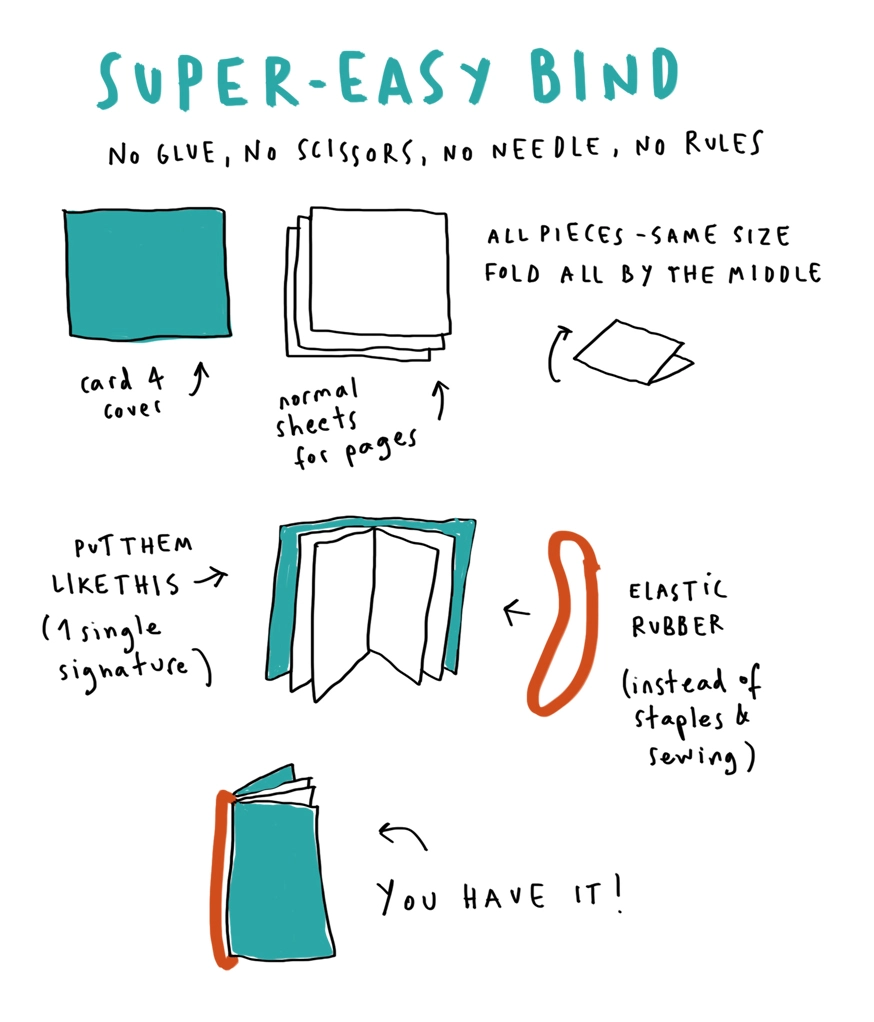
Poor Man’s Book Binding
How to Make Charcoal to Amp Up Your Cooking and Garden
Steps for Making Charcoal
First, gather your tools to make charcoal. You need a shovel, a barrel (optionally), a firestarter, a lid, wood, and water.
Picking the right location is essential to make charcoal safely. You don’t want leftover ash all over the place, but more importantly, you don’t want to light anything on fire. Choose an open space without surrounding trees away from buildings.
Stay away from dry, flammable plants or debris.
Set your barrel in place or dig a hole at least three feet deep. The diameter should be just a touch smaller than your lid. Make sure you have all your wood ready. You’ll probably need more than you think.
You want the wood to be cut fairly small.
Start a small fire at the bottom of a barrel or pit. It’s easiest to start a fire with charcoals and let them get nice and hot, but you can also do a wood fire.
To do this, create a base of small, tented sticks over some tinder. Light the tinder using your match or lighter. Once you have a small, steady fire going, add a small log. As that log catches fire, add more wood until you have a nice fire going.
One of the most important things about building a fire is allowing it to breathe. This means you shouldn’t crowd the fire with too many pieces of wood. There should be a fresh flow of oxygen and enough surrounding space for the fire to grow.
Once you have at least two inches of red hot coals, it’s time to add the wood that you’ve prepped for making your charcoal. Place the wood in layers. Wait for all the wood to catch on fire and then cover the pit or barrel.
To make charcoal, the goal is to limit the oxygen supply to lower the heat. You want the wood to burn slowly. To help lower the temperature, pile some soil or dirt on the lid.
Check the wood after about seven hours. It should no longer be smoking. If you see smoke, close the lid and let it smolder a bit longer. Do this quickly because the fire might combust if it gets too much oxygen.
Once the pile is no longer smoking, leave the wood to sit for at least 24 but up to 48 hours to cool. Now you have your charcoal!
Move the charcoal to a storage container.
Wood to Use to Make Charcoal
When it comes to wood choices, there are lots of options for making charcoal. If you want lump charcoal, you must use hardwood. Oak, walnut, ash, apple, cherry, hickory, and beech are all good choices.
Make your own reusable Swiffer pads to ditch the toxic single-use wet mopping cloths
If you’re wondering why you might not want to use Swiffer’s single-use wet mopping cloths (or even their dry cloths or dusting cloths, for that matter!), here’s why. Yes, they are super practical. But, if you care about your health, you’ll want to reconsider. The Environmental Working Group gives Swiffer wet cloths an F grade. That’s because they contain ingredients shown to disrupt hormones, cause developmental issues, cause skin irritation, respiratory effects, nervous system damage, damage to vision, and even cancer.
Reuse an old towel (no sew method)
You know that ratty old towel that’s been sitting in your dresser drawer? Now’s its time to shine. You can make your own reusable Swiffer pad with it.
You’ll need:
- Your old Swiffer mop
- A medium-size old towel
- A measuring tape
- A pair of scissors
Cut out 11×10” rectangles from the old towel. That’s literally it. Now you can use them by pushing the fabric into the 4 Swiffer holes to secure.
You could also sew the borders to make these hold up in the wash, or even skip all the cutting and sewing and just use an old wash cloth.

Here’s a recipe for a non-toxic floor cleaner:
- 2 gallons of water.
- 1/2 cup of isopropyl (rubbing) alcohol.
- 1/2 cup distilled white vinegar.
- 2-3 drops of dishwashing liquid.
- 2-3 drops of essential oil (optional)
Homemade Fabric Softener Recipe
Ingredients
- 3 cups hot water
- 1½ cups white vinegar
- 1 cup conditioner in whatever fragrance you like (very inexpensive bottles of conditioners work great!)
Instructions
- Put 3 cups of hot water into a container
- Add 1 cup of conditioner
- Using a whisk, stir the water and conditioner until combined
- Add in the white vinegar and whisk again
- Shake before using. Add about 2 tablespoons to the fabric softener dispenser for an average size load of laundry (more or less depending on the size of the load). Or, add it to a Downey ball
Notes
*Note: this can be used in an HE washer! Simply add this homemade fabric softener to your washing machine like you normally would. Some machines have a drawer or compartment for fabric softener to be used.
Picture tutorial- How to hide wires


Yarn-Wrapped Wine Bottles
These yarn-wrapped wine bottles are just so clever and pretty! Use them as vases or centerpieces anywhere in your home that needs a pop of color. The possibilities are endless…


Materials
- Empty wine bottles: various shapes and sizes
- Yarn: a few different shades and textures
- Hot glue
Instructions
- Lay a wine bottle down on its side.
- Slowly apply a thin layer of glue in small increments to the bottom edge of the bottle, pressing the yarn down on the glue. Do this to the entire bottom edge.
- Now roll the bottle, keeping it on its side, allowing the yarn to wrap around.
- About every four or five rows, apply about an inch of a thin layer of glue. Continue up to the top of the bottle.
- Optional: Decorate with buttons, artificial flowers, felt pieces, flowers or swirls made from yarn, beads, or twine.
From dengarden.com
Heat-up rice bag and flannel case- Great DIY gift
Here’s what you’ll need:
- 1/4 yard cotton canvas to hold the rice
- 1/4 yard cotton flannel for the case
- About 2 lbs rice
1. Cut out the bag and pillowcase. You can make them any size you want, but remember to make the cover bigger than the rice bag. I recommend making the flannel case about 1/2″ larger than the rice bag at finished size. For a neck wrapper bag, you may want a longer, narrower bag and pillowcase; for one to put on your belly or low back, maybe a more square rectangle.
2. Sew the short seams and bottom long seam of the rice bag, while inside out. Then, pull it all rightside out
3. Measure and mark to divide the bag into four channels. Pin where you will sew the dividing channels.
4. Sew the channels closed, along the lines you marked and pinned.
5. Fill the channels about 2/3 full with rice. Pour carefully and keep the bag upright wedged between your desk and your lap or something.
6. Pin the tops of the channels closed and pin the opening closed, turning the fabric in to hide the edges.
7. Measure and sew your flannel outer case to fit over the rice bag, leaving a short side open. Turn the open edge in and sew to hide the unfinished edge. You could make different cases for the same rice bag. Then, you would have color choices and be able to wash one case while still using the bag.


Tips: You can mix in some dried lavender flowers with the rice to give a relaxing aroma. You can try a smaller square size for a countertop hot pot ‘trivet’. And you can even make very small squares for pocket hand warmers.


Fabric Wrapped Clothes Hangers

These are super easy and look so pretty! Or, you can use neutral colors for men’s hangers. Clothes don’t slide off of these like the plastic ones. Start with a plastic hanger. Just pick out fabric about an inch wide- and the longer, the better. A simple glue stick will suffice for securing fabric to a starting point. Then just wrap, overlapping as you go. Secure the end with the glue stick and you’re done. Easy peasy!
Ingredient Substitutions Everyone Should Know
Ingredients matter, especially in baking, so knowing an equivalent ingredient substitution that will work the same way is important.
Common Baking Ingredient Substitutions
Baking Powder
Certain recipes will call for baking powder as a rising agent. It’s job is to create air bubbles which give your baked goods a light, airy texture.
- For every teaspoon of baking powder, replace with ½ teaspoon vinegar and ¼ teaspoon baking soda.
Baking Soda
Certain recipes will call for baking soda as the rising agent, usually in combination with an acid. Baking soda’s job is to create air bubbles which give your baked goods a light, airy texture.
- If you don’t have any baking soda, triple the amount of baking powder in the recipe. So if a recipe calls for 1 teaspoon baking soda, use 3 teaspoons baking powder instead. If a recipe calls for baking powder, also include that amount in the recipe.
Cornstarch
Generally speaking, cornstarch is used as a thickening agent when added to soups, stews and gravies. Because it’s denser than flour, less of it is needed to thicken a liquid to the desired consistency.
- Substitute 1:1 with one of the following:
- Potato starch
- Rice flour
- Tapioca starch
- Arrowroot powder
- Xanthan gum
- Psyllium husk
- If you don’t have any of these, use one and a half times the amount called for of all-purpose flour.
Cream of Tartar
Cream of tartar is often called for when whipping egg whites. It stabilizes the bubbles, helping them not to deflate. It also prevents crystallization, so depending on your recipe, it may or may not be absolutely necessary.
- For every ½ teaspoon cream of tartar, sub one teaspoon lemon juice or white vinegar.
Specialty Flour
- Cake Flour Substitution – Add 2 tablespoons of corn starch (I only use non-GMO organic corn starch) to a one-cup measuring cup. Top off the cup with all-purpose flour.
- Self-Rising Flour Substitution – Add 1 ½ teaspoons baking powder and ¼ teaspoon salt to a one-cup measuring cup. Top off the cup with all-purpose flour.
Cocoa Powder
If you run out of cocoa powder and need to make a recipe that calls for it, try substituting one of the following…
- Use 1:1 one of the following options:
- Powdered peanut butter
- Carob powder
- Baking chocolate
- Hot cocoa mix (though this option may not always work, you may be pleasantly surprised by the results!)
Pumpkin Pie Spice
I don’t like cloves, and store-bought pumpkin pie or apple pie spice always includes this. So, I created my own recipe! Mix this up with or without cloves and never buy these spices again.
- Mix together 2 teaspoons ground cinnamon, 1 teaspoon ground ginger, 1 teaspoon ground nutmeg, and either ½ teaspoon ground cloves (optional) or ½ teaspoon ground cardamom (optional).
I call this pumpkin pie spice, but it works well in homemade apple pie filling and for spice cake as well.
Allspice
Allspice is simply cinnamon nutmeg and cloves, so mix up your own with the following…
- Mix together ½ teaspoon ground cinnamon, ¼ teaspoon ground nutmeg and ¼ teaspoon ground cloves. Use 1:1 as you would Allspice.
Liquids
Buttermilk
Real, cultured buttermilk is a beautiful, beautiful thing. One of the reasons it’s so gorgeous is because it adds extra acid to a recipe, which produces a flakiness and light, airy texture. So if a recipe calls for buttermilk, like buttermilk biscuits, you do not want to use regular milk. You need that extra acid.
- One cup of milk and one tablespoon of apple cider vinegar or one tablespoon of lemon juice. Stir to combine and let it sit for about five to ten minutes. It will curdle slightly, then just go ahead and use it in your recipe.
- One cup of yogurt, sour cream, or kefir. Make sure that it’s unsweetened and not flavored and sweetened.
Half & Half
Half and half is simply half milk half heavy cream. You can easily make this at home, but you will want to pay attention to the milk you’re using. For example, if you’re using whole milk, a 1:1 ratio will work well. However, if you’re using skim milk, you may want to increase the heavy cream portion.
- Equal parts milk and heavy cream.
- Whole milk + butter
- Evaporated milk
- Sour cream, plain yogurt or greek yogurt thinned with a little water (these will add tanginess)
Milk
Milk is one of the easier ingredients to substitute. Sometimes it’s just being used for liquid purposes, but oftentimes the fat in the milk is necessary for the recipe.
- Almond or coconut milk (canned or carton): make sure it’s unsweetened.
- Plain yogurt and/or sour cream, thinned out with a little bit of water.
- Water and a teaspoon of melted fat. Fat options: butter, coconut oil, lard, or avocado oil. I recommend using avocado oil as a flavorless option.
Heavy Cream
I’ll admit I run out of this one far too often… maybe it’s because I’ve been a bit too liberal with the cream in my coffee or homemade hot cocoa!? If you need heavy cream for baking, here’s a good substitute for you.
- ¾ cup milk (preferably whole) and ¼ cup melted butter.
Eggs
There are many options when it comes to egg substitutions. Depending on what the egg’s purpose is in the recipe, one of the following options should work.
- Flax egg – combine one tablespoon of ground flaxseed with three tablespoons of water. Mix well and let sit for five minutes before using.
- Chia egg – combine one tablespoon chia seeds (ground or whole) with 2 ½ tablespoons water. Mix well and let sit for five minutes before using.
- Mashed banana
- Applesauce
- Yogurt
- Buttermilk
- Sweetened condensed milk
Yogurt
Because yogurt is tangy, any of the following dairy products can be swapped out (and vice versa!). I usually have one of these on hand at all times (or at the very least, faux buttermilk).
- Creme fraiche
- Sour cream
- Buttermilk
- Cottage cheese (blended)
- Ricotta cheese
Fats
Butter
It really depends on the need for butter in the recipe as to which of the following ingredient substitutions you choose. In general, you can substitute 1:1 for your specific recipe. The results may not turn out exactly the same, but it could save you from having to toss your ingredients!
- Olive/Avocado oil
- Coconut oil
- Pumpkin puree
- Applesauce
- Greek yogurt
- Bananas
Shortening
My hope is that you’ve long eliminated shortening from your cupboard. But some of great-grandma’s recipes do call for it! So here are my healthier go-tos when it comes to ingredient substitutions for shortening:
- Butter
- Lard
- Coconut oil
- Ghee
- Bacon grease
Oil
Many times different oils can be swapped out successfully. For example, I can swap out avocado oil for olive oil in any dressing recipe. The most limiting factor when substituting an oil is the desired flavor profile for the recipe.
You wouldn’t want to substitute sesame seed oil in a baked goods recipe calling for butter. However, you can sometimes successfully substitute a flavorless oil such as avocado oil or coconut oil for butter.
This takes a little practice in knowing what the end result should taste like and thinking about what other oils you have on hand.
However, when it comes to oil and baking, there are a couple other options. These oil substitutions for baked goods work great if you run out of oil or simply want to cut down on the calories of your favorite recipe. The beauty of these ingredient substitutions is that you can substitute all or some of the oil in a recipe.
Oil substitutions (for baked goods)
- Apple sauce – swap out cup for cup.
- Pumpkin puree – swap out cup for cup.
- Mayonnaise – though this wouldn’t be considered a low-calorie option, you can substitute mayonnaise in baked goods for the oil called for in the recipe.
Pro Tip: If your apple sauce has sugar in it, or is really sweet naturally, then you may want to cut back on the sweeteners within the recipe.
Sour Cream
Some ingredient substitutions will work better than others here. Again, consider your recipe and choose which one will work best.
- Yogurt
- Mayonnaise
- Buttermilk
- Creme fraiche
- Cream cheese
- Milk kefir
Cream Cheese
Not having cream cheese for certain recipes will be a show stopper. However, you may be surprised when you think outside the box!
- Depending on the recipe, you can try one of the following: blended cottage cheese, greek yogurt, ricotta cheese, mascarpone cheese, Neufchatel, or even milk kefir with some chia seeds to thicken it.
Peanut Butter
This may seem like a no-brainer, but I’m not going to assume you all know that most nut-butters can be substituted 1:1 in any recipe. Have you ever tried making hazelnut butter cookies? You’re welcome!
- Almond butter
- Cashew butter
- Walnut butter
- Hazelnut butter
- Pecan butter
- Sunflower butter (nut-free option)
Sweeteners
Honey
Though your recipe may not turn out exactly the same, most sugars can be substituted out. It’s important to know if the honey is used as a thickener or binder in a recipe. For example, if you’re making no-bake oatmeal bites, you’ll want to substitute another “sticky” sweetener such as molasses and possibly maple syrup.
- Raw sugar
- Brown sugar
- Maple syrup
- Molasses
- Date paste
Moleasses
The same goes for molasses as with honey. Many times the molasses is creating a desired consistency in the recipe. In which case, honey or sorghum syrup are your best ingredient substitutions here.
- Honey
- Maple syrup
- Sorghum syrup
- Simple syrup
Maple Syrup
There’s no real substitution if the hope is topping homemade pancakes or waffles… however if a recipe calls for maple syrup as the sweetener of choice, you have some options:
- Honey
- Molasses
- Simple syrup
- Brown sugar syrup
- Coconut nectar
- Agave nectar
- Keto syrup alternative
Corn Syrup
I don’t use corn syrup very often, except during some of those holiday baking episodes (most candy making, some fudge recipes, caramels, homemade marshmallows, popcorn balls, caramel corn, etc., tend to call for it). I also try to stay away from GMOs, which most corn products are made from GMO corn.
If you find yourself needing corn syrup and don’t want to make a special trip to the grocery store, I have two options for you…
- Honey or maple syrup, you’ll use the same amount as the recipe calls for.
- Water and sugar. Take 1 cup of sugar and a ¼ cup of water. Heat the water up a little bit so that the sugar fully dissolves into it. Then you can use that in place of corn syrup in a recipe.
Brown Sugar
You don’t want to just substitute in regular white sugar because the brown sugar has the molasses in it which adds flavor and moisture, causing your food to come out dry.
- Light Brown Sugar – One cup regular sugar and one tablespoon of molasses.
- Golden/Dark Brown Sugar – One cup regular sugar and two tablespoons molasses.
Pro Tip: I only use organic evaporated cane juice in our home. It’s very similar to sugar in the raw with a caramel creamy color. This substitution will work fine no matter what type of sugar you have. Either the sugar in the raw, the evaporated cane juice, or regular white sugar. Doesn’t matter. I’ve tested it with all of them. However, using raw organic or evaporated cane juice does make this a tad more of a healthy substitute for brown sugar in baking. If you don’t have any molasses, you can use maple syrup or honey as a mock brown sugar.
Powdered Sugar
Now that I know how easy it is to make powdered sugar at home, I only buy it when I need it for specialty items, like homemade frosting. This homemade version does tend to be a tad more “gritty” because, even with a high-powered blender, it’s hard to get it as smooth as the store-bought kind.
- In a high-powered blender, coffee grinder, or food processor, add one cup of granulated sugar and pulse it until it’s fine and powdery. Allow the machine to rest occasionally so it doesn’t heat the sugar up too much. This will make approximately 1 ½ cups of powdered sugar, so adjust according to your recipe.
From melissaknorris.com
DIY Grocery Bag Dispenser
There are very few things needed to make this dispenser:
- An empty Pringles can
- Duro Spray Adhesive
- One piece of 12 x 12 scrapbook paper.
- Boxcutter
- Scissors
Start by measuring the length of the Pringles can and then reversing the scrapbook paper to draw a line for cutting.
The spray adhesive will adhere to the scrap paper.
The final step was to cut a square in the top opening with the box cutter. This will allow the grocery bags to come out the top.
From thegardeningcook.com

Make a Fruit Bowl Gnat Trap
This idea of ridding your kitchen of fruit flies is simple. You place fruit in a bowl. Bananas and their peels are a good option. If you have some overripe peaches, they’d be a helpful component to this trap as well.
When you’ve placed the fruit in the bowl, pour honey, sugar, white wine, or apple cider vinegar over the fruit. You can use a combination of these elements as well.
You’ll cover the bowl with plastic wrap and poke holes in the top with a fork. These holes will allow the gnats to get into the bowl, but the plastic wrap will stop them from being able to escape.
When the bowl is full, take it outside and pour warm water into the bowl. Put a few squirts of dish soap in the bowl as well.
Remember to take the bowl outside while doing this to keep from releasing any gnats in your home. When you see the gnats have died, discard what’s in the bowl and reset the trap to catch the next round.
Keep setting the trap until nothing is going into the bowl.
Article from morningchores.com
Make Your Own Reusable Swiffer Pads
So, you have an old Swiffer mop stored in your closet, but you aren’t sure how to use it without those toxic Swiffer mopping cloths? Don’t ditch the mop!
Why Swiffer Cloths are Toxic for People and Planet
If you’re wondering why you might not want to use Swiffer’s single-use wet mopping cloths (or even their dry cloths or dusting cloths, for that matter!), here’s why. Yes, they are super practical. But, if you care about your health or the planet, you’ll want to reconsider. The Environmental Working Group gives Swiffer wet cloths an F grade. That’s because they contain ingredients shown to disrupt hormones, cause developmental issues, cause skin irritation, respiratory effects, nervous system damage, damage to vision, and even cancer. Not to mention, they trash the planet by being highly toxic to aquatic life and create tons of non-biodegradable single-use wipes. (Are you outraged? You can start by supporting the reform of the outdated U.S. federal system for protecting citizens from toxic chemicals.
How to Make Your Own Reusable Swiffer Pads
These models work for 5”x10” Swiffer mops, which are the regular mops. Make sure to measure your Swiffer before getting started.
Reuse your old washcloth (no sew method)
The easiest way to make your own reusable Swiffer pads is by simply using an old washcloth and pushing the fabric into the 4 Swiffer holes to secure. That’s it. Avoid using microfiber washcloths or towels since these release microplastics into the waterways when washed.
Article from permacrafters.com
DIY light traps for bug-free homes
Light traps are effective for various insects such as moths, flies, beetles, and stink bugs — insects attracted to light are likely going to find themselves caught in traps.
Incandescent bulbs are . But these days, there are different lighting styles to choose from. Inexpensive UV LED flashlights are usually available at affordable prices and are good alternatives to incandescent bulbs. (Related: .)
Tools and materials:
- Sharp knife or scissors
- UV LED flashlight or white LED flashlight
- Empty soda bottle
- Dish soap
- Tape
- Cord
Instructions:
- Cut the bottle around where it tapers to the opening to create two pieces of plastic: the funnel (top) and the shaft (bottom). Invert the top piece, using is as a funnel for the trap, and secure it to the shaft with tape.
- Poke four holes, spaced evenly around the circumference of the bottle around the point where the pieces are together.
- Cut the cord into four equal lengths, tying one end each to the holes cut on the bottle.
- Run one of the pieces of cord through the lanyard hole in the base of the flashlight. Figure how high the light trap should be and use an overhand knot to secure the flashlight to the cordage.
- Tie all four cords together to hang the trap in the air.
- Fill the bottle with a little bit of water and dish soap, and hang the trap where insects are seen often. However, make sure to keep it away from where areas where people go about their daily activities.
The trap design can easily be adjusted to suit individual needs. For instance, if those who don’t want to hang the trap can opt for a thick wire instead of cord, and simply bend two lengths of wire in a hoop to secure the flashlight.
To make a smaller version of the trap, use smaller soda bottles and a desk lamp positioned over the top of the trap while shining the light down.
Meanwhile, a larger version could make use of plastic buckets, metal light shade, fluorescent light with holder, metal rods, flexible wire, and tin sheets.
Sugar water may also be used instead of soap to make the mixture more environmentally friendly and non-toxic. Simply dissolve sugar in water to make a kind of syrup to attract the bugs and insects to the trap.
Put the insect trap a few meters away from living spaces, kitchens, or dining areas to attract them away from you. This is to avoid getting them in areas where you don’t want them, and into areas where they can be trapped instead.
It is best to place the traps adjacent to outdoor living areas and garden areas so that you can keep track of the insects that are invading your property. The DIY light trap is a simple way of capturing these unwanted insects, but should not be used as a standalone for the bug trapping method.
Alternative pest traps
Vinegar bowl fire traps – For those who are not big fans of light traps, red-wine vinegar mixtures are a great alternative. Simply use a clean bowl and fill it with soapy and sudsy water. Add red wine vinegar and place it in the water bowl to draw flies to the water. Refresh the mixture a few times throughout the day to get rid of fruitflies.
Beer pit slug traps – It turns out that pesky slugs love beer, too. Use a small, shallow container with a bit of beer to make them leave plants alone. If there’s no beer on hand, a mix of sugar, water, and yeast works just as well.
Article from naturalnews.com
Laundry Symbol Reference
Putting this here for your use. Remember when they used to actually write out laundry instructions on garments? Those days are over and we’re left trying to figure out the crazy symbols. Here’s what they mean:


Bird Seed Wreath DIY

Here’s what you need:
3/4 cup flour
1/2 cup water
1 envelope unflavored gelatin
3 tbsp. corn syrup
4 cups birdseed
*Bundt pan or mold
Nonstick Spray
*If you want to fill your bundt pan, you’ll need to double the ingredients.
You can use a circle of wire in middle of the mold to give it some stability, similar to rebar in concrete.
Spray your Bundt pan/mold liberally with nonstick spray. Mix the gelatin packet with hot water until dissolved. Stir in the flour and corn syrup until mixed with the gelatin, then add your birdseed and combine. Pour or scoop your mixture into your pan or mold, pressing down with the back of a spoon. If you’re using a wire ring in the middle of your mold, add half your mixture, then the wire, then top the wire the seed. Place your mold in the refrigerator or somewhere cold (I placed mine on the porch) to set and firm up. After 24 hours, unmold your seed wreath. Mine popped right out but you may have allow your pan to warm up a bit first.
How to feed your chickens for FREE
Get your chickens to free range
Getting chickens to free range can be a challenge – especially if you consider factors, such as predator risk, disease and the quality of the forage content. Consider these positive aspects of free-ranging chickens:
- It makes them healthier. A healthy chicken will be able to slowly build up immunity to diseases, protozoa, bacteria and parasites it encounters while free-ranging.
- Free-ranging your flock offers an excellent source of daily stimulation. It helps prevent bad boredom behaviors, such as bullying, cannibalism, fighting and pecking.
- It gives them exercise and keeps your flock in shape, healthy and at a decent weight so they can stay productive.
- It provides a natural diet that puts their nutritional needs within their control. It also gives your flock the chance to eat free-choice foods and even consume a wider range of nutrients than what could be present in regular formulated rations of commercial chicken feed.
- It keeps your flock’s living space cleaner with the less time they spend in their coup and enclosure – the more usable nutrients a chicken consumes, the less waste it will expel.
A way to encourage chickens to free range is to provide them with food and water in different areas of the yard so that they have an incentive to explore their surroundings. With a little patience and effort, most chickens can be trained to free range.
Feed back their eggshells
Crushing eggshells into ½ inch sizes or so and feeding them back to your chickens is the easiest, most economical way to give them some extra calcium. Pieces smaller than that will pass through your chickens’ systems too fast and not be absorbed as well as larger pieces.
Eggshells should always be free-choice in a container separate from the feed so each chicken will eat as much or as little as it needs. Feeding your chickens shells from store-bought eggs or a friend’s or neighbor’s chickens is NOT recommended.
Extra eggs
If you have a large flock, feed those extra eggs back to your hens. Hard-boiled, poached or scrambled – they aren’t picky at all. This will also give them some extra protein, which will boost feather production, especially during their molting season.
Garden rejects
According to Murano Chicken Farms, funny-shaped veggies, hard peas and beans, split tomatoes and other pesticide-free homegrown garden rejects are perfect to use as free and nutritious chicken feed.
Weeds and yard waste
Weeds, like crabgrass, dandelions, purslane, stinging nettles, thistles and even plantain are delectable to your birds. Feed them to your chickens. Yard waste, like bush clippings, grass and leaves, is home to lots of creepy crawlies that your hens will love to munch. Collect these and drop them into your chicken pen.
Start a grazing box
A grazing box is essentially a raised bed or planter with chicken wire stretched over the top or protected hardware cloth. The seeds – grains and greens – grow through the chicken wire or taller than the hardware cloth, which allows your chickens to peck at without digging up the soil or the root systems. This works especially well with kale, lettuce and spinach that will regrow from the stems.
Grow a chicken garden
If you don’t like the idea of letting your flock into your garden, grow one just for themwith your leftover seeds. Plant them right in the chicken pen or adjacent area. You may want to block off access until your chicken garden gets established or they’ll eat up those tender little shoots. Once their garden starts producing, let your birds have access to the feast.
Compost pile
You can safely feed your chickens with compost – especially if you put one right in your chicken pen.
Compost pile includes yard waste, butchering scraps, fruits and vegetable scraps, kitchen leftovers and anything else you routinely compost that is still technically safe but no longer appetizing, such as bread heels, freezer-burned meats, stale Cheerios and wilted lettuce. It is not recommended that you feed your chickens moldy or spoiled food.
The pile will also attract worms and insects that will be a feast for your feathered friends. In turn, they will fertilize it, scratch it and turn it for you so you won’t have to do the work.
Maggot bucket
If you find the very thought of maggots repulsing, have no fear because your chickens will love them and you won’t have to touch them at all. All it takes is a simple five-gallon bucket with holes drilled in the bottom.
Suspend the bucket a few feet over the chicken pen, and put something in it like roadkill, deceased livestock pieces or raw butchering leftovers. The rotting carcass will attract flies, which lay eggs that turn into maggots. The maggots will fall out of the holes in the bucket and feed your chickens. Gross, but effective.
Article from greenlivingnews.com
DIY FACE WASH RECIPE FOR ANTI-AGING SKIN
INGREDIENTS
- 3 tablespoons coconut oil (warmed, not melted)
- 1 tablespoon jojoba oil
- 1/2 teaspoon castile soap
- 4 drops rose essential oil
- 3 drops frankincense essential oil
- 3 drops helichrysum essential oil
- 2 drops myrrh essential oil
- 2 drops lavender essential oil
DIRECTIONS
- Mix all the ingredients in a small mixing bowl.
- Store in an airtight container.
- Use a dime-size amount per face washing. Massage into the face and rinse off with warm water.
- Use daily or as needed.
- Follow up with a natural, light moisturizer
Resetting Your Circuit Breakers
This easy trick prevents electrical problems, not to mention a dangerous overload on wiring, Dole says. All you have to do is flip all your circuit breaker switches from the “on” to “off” position. Wait for 10 seconds. Then switch them back to “on.” “This small step will break down any corrosion on the circuit breaker contacts, which you don’t want, because it could lead to a bad breaker,” Dole says.
“That could cost you $500 to be replaced along with an electrician cost.” On the other hand, flipping won’t cost you anything – just be prepared to reset all your clocks after.
How to Create a Lasagna Garden
A lasagna garden sits above the ground. But, instead of filling it with fresh soil like you would a raised bed, you stack compostable materials like newspaper, cardboard, leaves, and grass clippings. Over time, worms and microorganisms decompose the material and turn it into a rich, nutrient-dense soil of its own.
How to Grow a Lasagna Garden
Building a lasagna garden is fast, easy, and fun. Here are the steps to take to layer one up at your home.
1. Scout Your Spot
Look for a flat spot that receives at least 6 hours of direct sunlight a day. Make sure it’s close enough to a water source that a hose can reach, but far enough away from your house that the potential odor from the decomposing materials doesn’t make it into your open windows.
2. Gather Your Materials
The ideal lasagna garden uses a mix of 4 parts high-carbon to 1 part high-nitrogen ingredients. If high school chemistry feels like a long time ago, take a deep breath—it sounds more complicated than it is. Here’s what you need:
- High-carbon materials. Think of these as your brown layers. You can include peat moss, dried leaves, straw, mulch, and sawdust.
- High-nitrogen materials. These are your green layers. Include materials such as grass clippings, vegetable scraps (or produce that’s past its prime), coffee grounds, and even manure from plant-eating animals.
- A base layer. Before you begin stacking up your ingredients, cover the area in newspaper or cardboard. You want a large base layer without any gaps, so make sure to overlap the sheets a bit.
If you’re short on materials, swap in a soil designed for raised beds, such as Miracle-Gro® Raised Bed Soil, in place of your carbon layer. At this point, you’ll also want to construct a frame if you’re not keeping it loosey-goosey.
3. Layer, layer, layer!
Stack your lasagna layers as follows:
- A base layer of wet newspaper and/or cardboard that covers the entire space. This will help smother any existing grass or weeds.
- A high-carbon (brown) layer, keeping your 4:1 ratio in mind.
- A high-nitrogen (green) layer about ¼ as thick as the carbon one.
- Repeat this process until you reach your desired height (18-24” inches tall is ideal).
4. “Cook” your Lasagna…
If you’re creating your lasagna garden in the fall or don’t intend to plant for several months, you can sit back, relax, and let Mother Nature turn your layers into a rich, nutrient-dense soil. To speed the process, cover it with plastic to trap heat.
5. …or Plant Right Away
Alternatively, you can spread seeds on the top lasagna layer or pull layers apart and insert starter plants. If you do plant right away, make sure your layers of compost and any manure are fully decomposed so the roots of your plants don’t get burned.
6. Keep Your Lasagna Garden in Tip-Top Shape
As the growing season progresses, continue to follow the 4:1 ratio while adding compostable materials to the top to keep a steady supply of new nutrients coming into your plot. Pull weeds as they appear, and water as needed. In future growing seasons, add alternating layers to the top as needed.
Voila! With just a few basic materials and a little bit of time, you’ve created a rich growing environment for your favorite fruits, veggies, herbs, and flowers. You get to grow what you love in your own backyard while using things that might have been otherwise thrown away. If that’s not gardening smarter instead of harder, we don’t know what is.
Here’s a good graphic of typical lasagna garden layers:

DIY Birdseed Ice Ornaments

These are nearly impossible to mess up so it’s a perfect craft to do with kids. I’m planning on making a whole batch with my little cousins this weekend.
After using forests of scrapbooking paper in my life it’s nice to finally find a “green” project that gives back a little. The birds will thank you this winter!
Birdseed and Cranberry Ice Ornaments
There are a few ways you can make these ice ornaments. I’m a huge fan of using silicone ice cube trays because you can pop out the ornaments without worrying about breakage. But if you want to see your ornaments from far away, then something bigger (and fancier?) might be in order. In that case, try using a bowl a bowl and small drinking glass to create a wreath shape with a hole in the middle (a silicone donut mold also works).
If you don’t like either of those options, feel free to re-purpose something from the kitchen, such as an old yogurt container, the bottom of a paper milk jug, or an empty aluminum can. Depending on the mold you choose, you might find it hard to get the ornaments out. Simply let the ornament thaw for several on the counter or run it under warm water for a few seconds and it should, hopefully, pop out cleanly.
Once you’ve chosen your mold, you’ll want to pick out your seed. You can use store-bought birdseed or a mixture of nuts and seeds from your pantry. Birds love things like sunflower seeds, millet, quinoa, unbuttered popcorn kernels, fresh berries, dried fruit, and even crushed eggshells.
Supplies needed
-Water
-Bird seed
-Whole cranberries (fresh or frozen)
-Twine
-Scissors
-Ice cube tray and/or bowl with flat bottom and a small glass
To make an ice ring, place the glass (I used a shot glass but you can use a drinking glass) inside the bowl. Fill the bowl with an inch or so of water then add bird seed and cranberries. Place in freezer over night. Once frozen, pop the ring out of the bowl (letting it thaw for several minutes on the kitchen counter helps) and run some twine through the center to create a loop.
For the cubes (or any other fun shaped ice cube tray you might have) begin by cutting a piece of twine and tying it into a loop.
Place fresh or frozen cranberries in each of the tray cavities.
Add the twine knot down. You don’t want the twine poking out the bottom of the finished ice ornament (not that the birds will mind) so try to make sure it isn’t touching the bottom of the tray. To help hold the twine in place, I like to clip a clothespin around the twine and then rest it on the edge of the ice tray. You can also just add more cranberries to help hold the twine in place.
Fill the rest of each ice cube cavities with birdseed and water (it doesn’t really matter which order you do it in). I like to mix things up by using just cranberries in some ornaments, just birdseed in others, and sometimes a mix. It’s up to you.
Put the ice cube tray in the freezer overnight.
In the morning, take your ornaments outside and hang them from the branches of a nearby tree. If you live in a cold climate (lucky you!) your ice ornaments should last for days or weeks without melting. If you live in a warmer climate, like me, they’ll melt pretty quickly. As they do, the seeds will drop away and birds will scavenge them off the ground.
Article from helloglow.co
Make a Wall Wine Holder

This wine bottle holder project takes just minutes to build and can be made for free or close to it if you have the right scraps. Another great holiday gift for your wine-o friends. 🙂 While it is a simple design it looks great on a wall and could be customized with stain or switching up the wood type for a more modern look!

From rogueengineer.com
DIY Wood Slice Cutting Board

Supplies Needed
You simply need an old tree stump, sand paper, some mineral oil and a way (or someone handy) to cut the tree stump into slabs. Once you have your tree stump cut into slabs, you’ll want to be sure to allow the slab to completely dry or cure first.
Once the wood is cured, you’ll want to sand the slabs. First, sand with coarse (50-grit) sandpaper, then with a finer (120-grit) sandpaper. Wipe off dust with a cloth.
Use a clean cloth to rub mineral oil into the wood slab. Janna says you can wait 20 minutes and then apply another coat. I’ve always applied the first coat, waited 24-hours and then applied my second coat. You may need to apply three or four coats to properly season the wood. But, trust me, you don’t want to skimp on this important step. Once you have applied your final coat of mineral oil, wipe off any excess and buff to a nice shine.
Don’t have a tree stump?
No worries! You can purchase pre-sliced and pre-sanded wood slices at your local craft or hobby store. Then you’ll just want to be sure to apply the mineral oil to condition the wood.
Article from thebirchcottage.com
Homemade Natural Mouthwash
MATERIALS
- ▢ 1 tsp. salt
- ▢ 1 tsp. baking soda
- ▢ 1 tsp. xylitol
- ▢ 8 drops peppermint essential oil or other oil(s), optional
- ▢ 20 drops mineral drops
- ▢ 1 cup distilled water
INSTRUCTIONS
- Add all of the ingredients to a storage bottle and mix thoroughly.
- Shake before each use to help disperse the oils and any baking soda or traces of salt that may have settled to the bottom of the bottle.
Notes
To use, pour a small amount into a glass. (15ml or 0.5 ounces is a good estimate of how much to use.) Swish the mouthwash in your mouth for around half a minute. Finish by gargling the mouthwash to help clean the back of the tongue and throat.
Mouthwash can be used before or after brushing your teeth. It can also be used between brushings, when you can’t conveniently brush your teeth throughout the day. It can also be used as a gargle for a sore throat.
Take care when using essential oils with children. If they will likely swallow the mouthwash, rather than spit it out, it’s probably best to leave out the essential oils or have them avoid using a mouthwash altogether.
While the salt and the alkalinity of the baking soda help preserve the mouthwash, it’s best to make small batches more frequently rather than keeping a large batch for a longer period of time.
The American Dental Association does not recommend using mouthwash in children under 6 because they have not fully developed their swallowing reflex yet and may swallow large amounts.
Restore Free Flow to a Faucet

When a kitchen or bathroom faucet loses pressure or starts spraying to the side, it’s usually due to a dirty aerator screen. Luckily, cleaning a screen is an easy job. Start this fix by closing the drain plug (so you don’t drop parts down the drain). Then remove the aerator using a rag or masking tape so you don’t mar the finish with your pliers. To remove the sand and other deposits, soak the aerator in vinegar, then scrub it with a toothbrush. This usually solves the problem. If you have to disassemble the aerator to clean it, lay out the parts in the order you removed them so you can reassemble them correctly.
From familyhandyman.com
7 Ways to Minimize Pet Shedding Around You & Your Home
Fur in our homes is a fact of life for the caregivers of pets that shed, but it can certainly be kept to a minimum. Brushing every day during shedding season is of the utmost importance, but in addition to that, the following will greatly help to reduce pet hair in your home:
1. Use a damp rubber glove to gather fur from upholstery or carpeted corners for easier removal.
2. Keep a lint roller by the door, in the car and even at work to keep fur off your clothes.
3. Your laundry looks like an awesome bed to pets. Try to put it away ASAP.
4. Consider a vacuum cleaner specifically designed to remove pet hair more effectively. We no longer have to deal with fur & slobbers on our floors with the hands-free Shark® AI VacMop, which does it all automatically through an app, wi-fi, or smart home device. For carpets, we use the the cordless Shark® WANDVAC™ System, which is built to tackle pet fur as both a stick vacuum and detachable handheld vacuum.
5. Sprinkle baking soda over your carpet to loosen pet hair and deodorize at the same time.
6. Electrostatic dust mops help control fur as you sweep.
7. A dry rubber squeegee can be used to ‘rake’ carpets using short strokes to pile pet hair for easy removal.
From allnaturalpetcare.com
How to Remove Rust from Cast Iron Pans
Lisa asked, “I was given an old cast iron corn bread muffin pan (muffins are shaped like ears of corn) and need to know how to clean it properly. It has some rust on it.”
Over time, cast iron pans can get rusty. Drying them thoroughly after each cleaning does wonders for preventing rust from forming. However, if your pans already have rust, removing it is easy with the method below.
You Will Need:
- Cooking spray
- A soft cloth
- Dish soap
- A raw potato
Steps to Remove the Rust:
- Spray the rusty area with cooking spray and rub away the rust with a soft cloth. Clean off the excess oil when the rust is removed.
- Moisten the rust with dish soap.
- Cut off one side of a potato and scrub the soapy area with the raw potato.
- Rinse away the rust and allow the pan to dry completely before re-seasoning the pan.
Additional Tips and Advice
- For a move vigorous scrubbing, use steel wool or a steel wire brush.
Sources:
- Joey Green’s Cleaning Magic by Joey Green
- Haley’s Hints by Graham and Rosemary Haley
Planning and Building a Bee-Friendly Backyard
What makes a yard friendly to bees? According to the University of Maine Extension Service, bee-friendly areas:
- shelter and feed native bees
- support honey bees
- ensure good pollination of vegetables and fruits
- provide season-long beauty, diversity, and interest
Bees are attracted to certain colors
Just as you and I have favorite colors, it seems that bees do, too. They can’t see colors in the red end of the color spectrum, so good color choices are yellow, white, purple, orange, pink, and blue. Both of the flowering plants I bought from fill the bill — bright yellow daylilies and a gorgeous, deep purple Lily of the Nile.
There are so many gorgeous blooms and colors to choose from and doing a bit of research online helps before you venture out to the nearest nursery.
A few flowers to consider for your own bee-friendly backyard are:
- Basil
- Purple Coneflower
- Fennel
- Goldenrod (also good for seasonal allergy sufferers)
- Lantana
- Lavender
- Lobelia
- Lupine
- Mint
- Oregano
- Rosemary
- Salvia
- Sunflowers
- Sweet alyssum
- Yarrow
It’s best to choose native plants. And make them sun-loving flowers that grow in clumps, rather than single blossoms on long stems. Plant them close together in 3’X3′ or larger plots. Bees are more attracted to clusters of blossoms and having them close together makes it easier for them to do their pollinating job.
Flowers with a nice landing area are also helpful. So is bloom size that accommodates the varying sizes of bees.
Avoid double-flowered plants which are bred for show and produce minimal or no nectar and pollen.
There are many other colorful plants, but as you can see, both flowering herbs and food-producing plants make bees quite happy and it’s a win-win if you’re trying to grow your own food! I’m adding different varieties of mint to my garden but will grow them in pots since they can be very invasive.
Plant a medicinal herb garden
Surprise! There are some herbs bees adore, such as mints marjoram, and lavender. Grow them and let them flower. The bees will thank you. Read more about planting a medicinal herb garden here.
Trees and Shrubs are also options
Plant pollen and nectar-producing trees and shrubs. It’s an effective way to extend the food supply throughout the year. They also create a microclimate and increase shelter. Some possibilities are:
- Apples
- Plums
- Cherries
- Maples
- Spirea
- Summersweet
Re-think pesticides/insecticides
Along with helpful insects like bees, butterflies, and ladybugs, there are also mosquitoes and other insects that we definitely do not like! However, the overuse of insecticides poisons bees. Before reaching for an insecticide, do some research and try a natural remedy first.
Plant multiple pots of lemongrass, citronella, and lemon balm around your yard to ward off mosquitoes.
Add a simple water-feature
During long, dry seasons, beekeepers have to make sure there is plenty of water in the form of a pond, fountain, pool, bird bath, or other water feature. Even bowls or jars of water are better than nothing for helping keep bees hydrated.
Two key requirements:
- It’s vital the water moves and doesn’t stay still. Still water attracts mosquitoes and that’s the last thing you need when creating an inviting garden area. Our local birdwatching store sells a battery-powered Water Wiggler that creates continuous ripples. This not only attracts birds since they can more easily see moving water as they fly overhead, but it also prevents mosquitoes from landing and laying their eggs.
- The water should be shallow. Bees can drown if the water is too deep. Also, use stones or something that floats to provide landing pads in the dish. They can’t swim, either. Not even dog-paddling.
Create nesting areas
Lastly, most native bee species aren’t hive dwellers. Their home is soil or dead wood. Consider how you can incorporate habitat for these, the majority of our bee pollinators.
From thesurvivalmom.com
DIY Antibacterial Spray
The ingredients list for this fresh-smelling DIY spray includes witch hazel that can naturally fight off bacteria. It also includes some tea tree oil that can help prevent fungi from growing in your yoga mat. Tea tree oil will also prevent any germs from spreading infections like ringworm and athlete’s foot.
You can personalize this cleanser by adding some lavender or any other essential oil of your choice. If you don’t have any witch hazel, substitute some apple cider vinegar(ACV) instead. ACV can also effectively fight funky odors and prevent germs from spreading.
How to make a DIY antibacterial spray
Follow the recipe below to make a fragrant antibacterial spray.
Tools needed:
- Bowl
- Funnel
- 4 oz. BPA-free plastic spray bottle
Ingredients:
- 1 cup water
- ¼ cup witch hazel
- 3-5 drops of tea tree oil
- 1-2 drops of lavender or other essential oil for scent (optional)
Instructions:
- Combine the water and witch hazel in the bowl.
- Add the tea tree oil and your chosen essential oil to personalize the scent of the antibacterial spray.
- Carefully pour the mixture into a spray bottle using the funnel.
Instructions for use:
Shake the bottle thoroughly. Spray the DIY antibacterial cleaner on surfaces and let air dry.
From naturalnews.com
How To Track Someone In The Wild
Tracking someone in the wild is a useful skill that has many broad life applications, as it teaches us to take in the big picture first and then hone in on the details.
While we may never have to track down a fleeing criminal in the wild, a situation may arise where having the skills to track someone is a matter of life or death.
For instance, a child who wanders out into the wilderness, but doesn’t come back will require tracking to pinpoint their location.
From preparation, looking for tracks and signs, and remaining on the correct trail, tracking is both an art and science that requires patience, persistence, and practice.
Preparing To Track Someone In The Wild
Preparing to track someone in the wild is a prerequisite that greatly increases the possibility of finding the target. First, acquire all the pertinent information regarding the target including their shoe size, what type of shoes they are wearing, weight, height, the supplies they have with them, their skill set, and their motives.
After that, learn as much about the environment where the target is likely occupying before entering it. What type of terrain does this environment consist of? Which are the impending dangers specific to this environment? What is the weather like and are any storms expected to roll through the region?
If possible, secure a map of the area, prepare all supplies for the trip, including a camera, a notepad for notes and drawings, and a compass. If given the luxury of resting and eating before heading out into the wilderness, take advantage, as this will greatly improve stamina and morale.
Where To Start Tracking Someone In The Wild?
After gearing up for the trip, start by entering the general region where a target is expected to be and scan the macro environment. Then, look for any specific tracks and signs, otherwise known as spoor, and go from there.
Ideally, start looking for spoor in terrain that is muddy or sandy, as footprints are easier to spot. Then, move to other areas, if no clues can be found initially.
What Spoor Are We Looking For?
The best tracks and signs are footprints, as they can easily be followed to a target’s location. However, footprints aren’t present in all environments.
Additionally, a subject that does not want to be tracked often spoofs their footprints to push a tracker off their trail.
Other tracks and signs to look for include bent grass in one specific direction, broken branches, overturned rocks, and excrement or trash.
Additionally, fruit trees that looked like they were picked from recently, a man-made shelter, a lack of animals in the area, traces of blood, and broken spider webs all indicate that someone was recently in the area.
Broken spider webs are one of the best clues that can indicate how recently a target was in the area. If spider webs are completely broken, a target was recently in the area, often within the hour. If a spider web is partially re-built, a subject was likely in the area within the last three hours.
Tracking Footprints
Tracking footprints requires knowledge and practice.
An experienced tracker looks for a specific walking pattern, soil scatter, and transfer, meaning dirt from shoes is left on another object like a rock.
All of these clues together can determine how fast a target is moving, whether or not they are carrying heavy objects, and whether or not they are trying to hide their tracks.
For instance, subjects who don’t want to be tracked may walk backward or put their shoes on backward so the tracks are leading in the opposite direction. However, an experienced tracker can tell by soil scatter and compression whether or not a walking pattern is typical.
If tracking a hostile target, always be aware of a potential ambush and tactics designed to throw a tracker off the correct path. When tracking subjects like this, focus on the area 20 yards ahead, move slowly, and diligently look for unnatural changes in spoor, while keeping an eye out for potential traps.
If close to a target, slow down movement and in some cases, stop completely and drop to a prone position to lower the possibility of being spotted.
How To Track A Person In The Wilderness When Footprints Are Faint
When footprints are hard to see but still noticeable, perform a strategy known as sideheading to view important details.
When looking at a track from the top, it is often faint, so get close to the ground and look at the track from a side view where ridges and shadows can be seen in detail.
When looking at the track from the side, focus one eye about 1 foot away and focus the other eye at a distance of about 3 feet away. This can offer more information on which way the track is headed and pick up on the next spoor.
Losing Track Of The Target
Losing track of the target is common and requires a tracker to go back to the last known spoor to re-analyze it. There are two common ways to get back on target.
The first involves sweeping the entire area around the last track 360°, searching for the next spoor. The other, called the cross-grain method, involves walking to the right of the last track for about 50 yards and then turning left and walking for about 25 yards. At this point, turn left again and walk about 100 yards.
Then, turn right and walk 25 yards, while repeating the whole process if required. This allows the tracker to search for the next spoor in every direction and ideally pick up the next sign the target left behind.
Using Dogs To Track Someone In The Wild
Using dogs to track a target has its pros and cons. While the overall process of tracking someone with dogs is far easier, the target will also know you are near because dogs loudly make their presence known.
How To Track Someone In The Wild
Tracking someone in the wild comes down to knowledge, properly interpreting spoor, patience, persistence, and practice.
The most important factor is persistence, as a tracker will often find themselves at a loss for a continuation spoor and have to look hard for the next sign to get back on target.
Article by Eric Wolff, askaprepper.com
Lubricate a Lock with a Pencil
Don’t give up on a sticky lock, you can fix it with a pencil! Simply rub the teeth of your key with the pencil, coating it generously with graphite. Insert the key in the lock, which will deposit the lubricant inside. Repeat as needed until the key glides in smoothly.

How to Make Mead (Infographic)

How to Make Colloidal Silver (Infographic)

How to Fix a Leaking Faucet
You can fix that leaking faucet that’s been making you crazy. It’s easier than you think — and much less expensive than hiring a plumber. And although there are many styles and models of faucets, the process of repairing a dripping faucet is similar for all of them.
Types of Faucets
The first step is to figure out what type of faucet you’re trying to fix. Compression faucets control water by pressing a stopper against a metal opening inside the faucet. It’s like tightening the top on a bottle: As you turn the lid, it becomes tighter until it stops liquid from pouring out. If a faucet has separate handles for hot and cold water, it’s probably a compression faucet.
There are three general styles of another type — washerless faucets: ball, ceramic discand cartridge. These all work on the same principle: aligning two holes within the faucet to allow water through and moving the holes out of alignment to stop the flow of water. Washerless faucets usually have only one handle, but some cartridge faucets have two handles.
Regardless of which type of faucet you have, leaks most often stem from plastic or rubber seals (washers, seals, O-rings) wearing out and allowing a little bit of water to sneak past. It takes only a slightly worn or damaged seal to allow a drip of water to pass by every few seconds.
How to Fix a Faucet
Common tools you’ll need for faucet repairs include screwdrivers (both flat and Phillips), pliers and a channel lock (adjustable jaw pliers). Then follow these easy steps:
- Turn off the water supply to the sink. Valves are usually under the counter close to the wall. It’s also a good idea to close the drain of the sink so any small parts that fall into the sink don’t go down the drain.
- Open the faucet to release any water pressure in the lines.
- Remove the handle, which is usually held in place with a screw or Allen screw (screws with a hexagonal pattern in the head). The screw may be covered with a plastic, metal or rubber cover you’ll need to pop off using a flat screwdriver or butter knife.
- If the faucet has a large metal nut holding the internal parts in place, check if it’s loose. Tightening that nut with a channel lock pliers may stop the leak. If not, remove the nut, screw or spring-loaded metal ring that holds the internal parts in place.
- Pull out the internal pieces with a pair of pliers or the channel lock pliers, carefully noting how the pieces fit together. If the faucet contains a cartridge, don’t take it apart; simply replace it with a new one. It’s possible to install cartridges backward so you get hot water when you expect cold, and vice versa.
- Replace the washers, O-ring or seals (and springs if there are any behind the seals in a ball faucet). Get precise replacements from the hardware store. Remember it takes only a small gap to allow water to pass through. Hot and cold assemblies may have slightly different parts.
- If metal parts have mineral deposits on them, clean them with vinegar and a stiff-bristled brush, being careful not to scratch the metal. In some instances, the uneven metal is the cause of the leak. You can get special tools to recut the metal of some faucets to make it smooth again, but it may be just as easy to replace the whole faucet if that’s the case.
- Reassemble the pieces and turn on the water supply to test your work. It may take a few seconds for the air to get out of the line, so turn the water on slowly and expect a bit of sputtering.
Most parts of a faucet are made of soft metal that scratches easily. To protect the outside parts, cover them with masking tape before applying a plier.
Article from motherearthnews.com
How to predict the weather without any instruments
You don’t need a barometer to predict the weather because careful observation and knowing what to look for can be just as effective. Knowing how to predict the weather can be a useful survival skill to have when you’re out in the wild.
Wind is caused when air moves from a high-pressure area to a low-pressure area. Since weather moves in from the west, westerly winds indicate good weather because they suggest the bad weather is already to your east. Easterly winds suggest that the bad weather is coming toward you.
Use grass or flower petals to determine the direction of the wind. Throw your grass or flower petals into the wind and watch the way that it blows or falls. Detect the direction of the wind by wetting your finger and holding it out. The side of your finger that gets cool will tell you from which direction the wind is blowing.
Watch smoke from a fire
The air pressure determines what direction the smoke will go. In high pressure, the smoke will go directly up into the air. If the pressure is low, it will spiral back down around the fire. If you see the smoke spiraling back down, bad weather is likely on the way and is very close.
Watch for calm conditions
Before a storm, the low-pressure system can push out the area’s normal wind patterns and create a temporary calm before the storm begins. You’ll notice a lack of wind, which creates a stillness over the area. If you’re near water, it will be calm and still. This calm indicates a coming storm. At this point, you should be able to observe other signs of a storm, such as dark clouds.
Smell the air
Close your eyes and smell the air. Smells become wet right before a storm, making them stronger. Before a storm, you should also notice a compost smell as plants release their waste. If you start to smell a compost scent, it likely means that a storm is coming.
If you are near a swamp, you will likely smell swamp gases right before a storm. Swamp gas smells like rotten eggs because it comes from decaying vegetation.
Check for humidity
High humidity often precedes a storm, so watch for signs of high humidity. Curling leaves, frizzy hair and swollen wood are telltale signs that a storm is on the way. Pine cones can also tell you if it’s humid because they will stay closed if the humidity is high, but will open if the air is dry.
If you live in an area that always has high humidity, rely on other observations to predict the weather.
Look at the shape of the clouds
The types of clouds in the sky can tell you a lot about the weather. In general, clouds that are white and high indicate good weather and clouds that are dark and low mean rain or storms are on the way.
White, wispy clouds usually mean that the weather will be clear; flat clouds mean that the air is stable; fluffy clouds mean that the air is unstable; and smaller puffy clouds may look calm, but they often build over the course of the day.
Observe the position of the clouds
Clouds that look high usually mean that they are farther away but could become a weather threat up to six hours later. Lower clouds mean that bad weather is closer.
As the weather threat approaches, you will see the clouds move lower in the sky.
Check the color of the clouds
Clouds can be various shades of white, gray, black, and brown, and each also means something different about the weather.
Black clouds mean that there is a coming storm that does not have strong winds; brown clouds mean that there is a coming storm that does have strong winds; white clouds usually mean good weather, though a storm could be on its way later in the day; and gray clouds usually mean a new or a light storm.
Watch the movement of the clouds
The direction that the clouds are traveling can tell you if bad weather is on the way. Additionally, you should watch if the clouds are coming together or moving apart.
Lowering and gathering clouds are a sign of bad weather coming. Clouds that are rising and spreading out indicate that the weather is clearing.
Check for a red sky in the morning
Weather moves from west to east, while the sun rises in the east and sets in the west.
If you see a red sky in the morning, then it means that there is clear weather in the east, where the sun is rising, but bad weather in the west makes the sky look red. The bad weather from the west will be moving toward you, as that is how weather patterns work. The redness can appear as a bold orange to a deep red.
If you see a red sky in the evening, you can rest easy. This means that there are clear skies in the west coming toward you, while the bad weather is to the east moving away from you. Try to remember this rhyme: “Red sky at night is a shepherd’s delight; red sky in the morning is a shepherd’s warning.”
Look for a rainbow in the west
A rainbow in the west means that the sun’s morning rays are striking moisture to your west – the direction from which the weather is moving. This means that a storm is moving your way, indicating bad weather later in the day.
If you see a rainbow in the east, then it means that the weather has already passed over you, so clear skies are likely ahead.
Remember this old saying: “Rainbow in the morning gives you fair warning.”
Look at the moon
If the moon is easy to see in a clear sky, then it could mean that the weather is cooling. It may also mean that a low-pressure system is moving into the area, which clears away dust. This means rain could be on the way.
If the moon is visible, look for a wide halo that spreads out from the moon. A halo happens when the moon shines through cirrus clouds, which suggests coming rain.
Remember this old saying: “Ring around the moon? Rain real soon.” A ring around the moon means a warm front is coming, which usually brings rain. The ring is caused by ice crystals that are passing over the moon. A double halo around the moon could signal strong winds in the coming storm.
Also remember this saying: “Clear moon, frost soon.” A clear sky means that there are no clouds to hold in the planet’s heat. This means that the weather will be cooler that night and the next morning.
Look for high ant mounds
Before a storm, ants will build up their mounds and create steep sides. If you see raised ant beds, especially if they were lower before, then there may be a storm coming.
Look for bird migrations
Birds can sense air pressure and will time their migrations when the weather is good. If you see a flock of birds migrating in the sky, then the weather will likely be good that day.
From newstarget.com
How to Make a Burn Barrel
Whether you live out in the country or you just have some trash to burn, a burn barrel is a simple solution for cleaning up your home and yard. Before you start making one, check your local ordinances to make sure a burn barrel is allowed in your area. The smoke and smell of burning trash can be a problem for your neighbors, but with the right burn barrel you can minimize smoke and ash.
Instructions
1. Use a 55 gallon open end metal drum for the barrel. Use a hammer and metal punch to make 10 – 15 holes on the sides of the bottom of the metal drum. You can also use a drill to make the holes. Drill three or four holes in the bottom of the barrel to drain any rain water.
2. Once your barrel is set up for ventilation, set it on concrete blocks. Keeping the area underneath the barrel clear helps with drainage and airflow.
3. When you use the burn barrel, keep it covered with a burn cover. For the burn cover, use hardware cloth, fencing or a metal grate. It traps burning material inside the barrel and lets the smoke get out. Use a match to light any burnable material. When it’s not in use, cover the barrel up with sheet metal to keep rain water from getting in.
Using Your Burn Barrel
Once you’ve made your barrel, it’s important to know what can and can’t be burned. Any hazardous waste, such as chemicals or paint, should be properly disposed of. When it comes time to use the barrel, non-recyclable plastic, food wrappers and non-recyclable paper and cardboard can all be burned.
The idea is to burn one bag of trash at a time. If there’s too much trash in the barrel, it won’t completely burn. It’s best to burn one bag of trash at a time and wait to burn a second one. Some burn barrel users have a second barrel with a rain cover where they store trash waiting to be burned.
Burn Barrel Safety Tips
When you’re using your burn barrel, always use common sense and proceed with safety. Don’t burn on windy days or hot and dry days when there could be a fire ban. It’s crucial you don’t burn any aerosol cans. The cans will explode in the barrel. If your barrel is rusted or has too many ventilation holes, an exploding aerosol can can lead to flaming trash leaving the barrel. Finally, be considerate of your neighbors. The last thing they want is to be outside while you’re burning garbage. Make an arrangement with them for a good time to use the barrel.
Article from farmandfleet.com
Gulf Wax for Sticky Drawers
Rub a block of Gulf Wax along the wooden drawer slides and along any other high-friction points on the drawers. The drawers will operate much more smoothly.
Wooden drawers with wooden drawer slides often become sticky and difficult to open and close. Moisture is usually the culprit, making the wood swell or warp slightly and causing too much friction between the wood of the drawer and the wood of the slides. A sticky drawer can be very frustrating, especially if you use it frequently.
Try this quick fix: Rub a block of Gulf Wax along the wooden drawer slides and along any other high-friction points on the drawers. Gulf Wax is a household paraffin wax, commonly used for canning and making candles. The Gulf Wax will lubricate the moving parts and make the drawers operate much more smoothly.


From familyhandyman.com
How to set up a gravity-fed water system
It can be exhausting if you have to constantly haul water all over your homestead, especially if you are doing it alone. To save time and energy, you can address this by setting up a gravity-fed water system.
A gravity-fed water system is used to pull water from creeks, rain barrels, springs, streams and rivers upstream or uphill from the water source.
Gravity-fed water systems are simple, but you may have trouble using them under certain conditions:
- The distance the water has to flow to reach its destination point.
- The slope of the incline that determines how fast and how easy the water flows.
- The size of the pipes you use and if they have to interchange.
- The number of side extensions that will be used?
- The type of terrain the system is used to.
The guide for this gravity-fed, off-grid water system is from “The Doable Off-Grid Homestead,” an off-grid reference book.
DIY gravity-fed water system
Before setting up your gravity-fed water system, plan ahead and build a high enough roof so that the bottom of the tank is above your water input level, like your sink or bathtub.
You will need:
- Dirt
- Drill
- Level
- 12 to 14 grade stakes
- 1/4-inch (6-mm) thick plywood
- 1/2-inch (13-mm) screws
- 3/8-inch (9.5-mm) rebar
- 20 to 25 (80-lb [40-kg]) bags or ready-mix concrete
- 1,500 to 3,000-gallon (5,678 to 11,356-L) water tank
- Solar water pump, optional
Creating the platform for the tank
Build your water tower at a slightly higher elevation than where the water output is going, like the kitchen sink. When deciding how high to elevate the tank, keep in mind that the tank must be below the level of your roofline if you are directly catching rainwater into it.
You should also check your water pressure requirements. If you have fairly low water pressure, you can fill containers fairly quickly by using a larger-volume pipe. If this is something you want to try, you can reduce your water tower height considerably.
Level the dirt pile out and prepare a form by staking out a circle that is at least six to 12 inches (15.2 to 30.4 cm) wider in diameter than your tank. Pound in the stakes around the outside of this circle.
Cut the plywood into strips, six inches (15.2 cm) tall. Shape these inside the stakes to form the outer edge of the circle.
Screw the plywood into the stakes so that the tops of the plywood strips are level. Add rebar for extra strength if you want to.
Next, mix the concrete. Follow the manufacturer’s instructions and pour a smooth, level slab inside the form.
Let the concrete dry and cure completely before moving the empty water tank to the platform. Protect the hill from erosion and the tank from sun exposure by placing a small roofline over this tank.
If you have a pump-assisted gravity-fed water system, install a solar-powered water pump. Use this to pump water from other catchment tanks up to the elevated tank when the upper tank runs out of water.
Piping the water into the house
Run a 3/4-inch (19-mm) PVC pipe from the water tank to your laundry sink faucet. You can also conserve water by setting up a regular faucet in the kitchen sink that is suitable for handwashing due to its low flow rate.
For a smaller-scale water tower, create a 12-foot (3.6-m) platform using 4x4s. Elevate one or two 55-gallon (208-L) food-grade plastic drums and pump or manually move water to these drums every few days.
With this setup, whether you have a large volume water tank or a 55-gallon drum, it should be able to provide gravity-fed water in a sink or two.
This system takes a while to set up, but it’s worth it if you want to save time and effort hauling water from a water source to your home.
Article by Zoey Sky, naturalnews.com
How To Make Money During An Economic Collapse
Foraging And Selling Berries
Head out foraging to collect wild berries that you can sell or trade. Berries will always be in-demand because of the variety of foods and beverages that they can be included in, such as pies or juices. Just make sure you have the right knowledge about which berries are edible and which ones are not.
Chopping And Selling Firewood
Do you have a forest on your property? If so, then you can easily chop down and sell firewood. Anyone who has a wood stove in their home will be a possible customer.
House Cleaning
People will still want their homes to be clean after an economic disaster. Consider offering your house cleaning services if you have the skills and the time. You can consider using DIY cleaning products if you find the pricing of store-bought household cleaning items has gone up beyond your budget.
Selling Eggs
If you raise chickens, selling eggs will be a very viable way to make extra cash during a future economic depression.
People like their eggs because they’re a good source of protein, so the demand for them will still be high during difficult economic times.
Renting Out Rooms In Your House
An economic depression means that rental costs may skyrocket and leave many people scrambling for a place to live that they can afford the monthly rent on.
If you’re comfortable renting out rooms in your home, it will be a perfectly viable way to make money. Just make sure the people you’re renting out to can afford to pay their rent.
Hunting and Selling Meat
If you’re a skilled hunter, you could go out hunting and get meat that you can butcher and sell later.
Meat will always be in demand so you’ll always have people willing to buy or trade even during an economic depression. Besides the meat itself, you could also sell the fur and hides you collect as well.
Mending/Fixing Clothing
Clothing will become a more precious commodity in an economic disaster as people will focus more on repairing the existing clothes they have rather than buying new ones.
If you have any skills with mending clothing, consider turning it into a way to make extra cash.
Growing And Selling Vegetables
Growing vegetables in a garden is an excellent way to ensure you can be self-sufficient. Consider selling or trading your vegetables to other people as well, so long as you are growing enough vegetables for your family already and have enough left over that you can afford to give up.
Selling Baked Goods
Do you have good baking skills? If you can make bread, cakes, cookies, muffins, or any other kind of baked goods you’ll likely always have someone willing to buy or trade following an economic collapse.
There are many other ways to continue to make money or trade during an economic collapse beyond the ones we’ve discussed above, but hopefully this list has given you an idea of things you can do.
Finding yourself stuck in debt and not having enough cash reserves to fall back on is the worst position you can be in leading into a future recession or depression.
Start paying down your debts and setting aside money as fast as you can, and keep in mind that there will always be ways that you can trade or make money even following an economic crisis. All you have to do is get a little creative.
Article by NICHOLAS OETKEN, askaprepper.com
Different ways to Protect Berries From Birds
The best way to ensure that you get to enjoy your berries before the birds do is to take a multi-pronged approach. Exclusion methods like netting or cages are the only methods that work well entirely independently.
Bird Nets
A bird net is a simple and highly effective method to protect berries from birds. Nets can be used in bigger spaces but are also suitable for a small crop of berry plants. Setting up a bird net to protect berries from birds is easy, as you only need a few materials.
You need poles, rope, stakes, and bird-friendly netting for a basic bird net. Pick a netting material that won’t entangle birds when they land on the surface. These are usually labeled as “bird safe.”
Measure the length and width of the garden area to get the correct measurements for the bird net. You can use multiple nets, but make sure they overlap when you install them to prevent birds from sneaking in through the separation.
You can lay netting directly on plants, but it’s better to prop it up using poles or some other kind of frame. Tie the netting to the poles using twine, rope, or zip ties, and then secure the netting to the ground using rocks or stakes.
A teepee shape is an easy way to make the bird net stand above plants. A rectangular set-up is more effective for a raised bed or large area of berry plants.
Just remember that birds can get tangled and die in netting. Nets that are taut and firmly secured are less likely to tangle up our flying friends.
Cloches
Cloches can be placed over individual plants, making them an easy solution to protect berries from birds for small plants like strawberries. You don’t have to cover the entire plant; the cloche can protect the berries in a small section.
There are affordable options like chicken wire cloches available online. It’s possible to build your own cloches with plastic.
Glass and plastic cloches raise the heat and humidity inside them, so use caution if you opt for one of these. Otherwise, wire cloches let air circulate and don’t raise the temperature. They also allow pollinators to access the plants.
Remember to hand pollinate during the flowering season if you use solid glass or plastic cloches. Otherwise, the flowers won’t be pollinated, and the quality of the fruit will decrease, or the fruit won’t form at all.
Crop Cages
Crop cages are more challenging to install than netting, but they’re much easier to use and don’t have the potential to become a tangled mess. You can purchase ready-made cages, or you can make a DIY option at home to protect berries from birds.
Netting can also become untucked, or critters might find their way under, giving birds access to the plant. Replacing the net every time it rips or tangles up can be frustrating.
Crop cages are typically more secure, and they can be made out of metal so there’s no ripping to worry about.
The downside is that they cost more and you need to have room to store them during the winter.
Provide Other Food
Food is the main attraction for wildlife in your garden, so you can solve the problem of berry picking with a simple solution: provide other food. Using bird feeders to distract these animals will prevent them from looking for food amongst your berries.
Plus, you don’t have to worry about them getting injured on netting or cages.
The bird feeders can go near the berry plants so they can land there. This will limit temptation and give them enough food to keep them busy for a few minutes. After a full stomach, they will hopefully move on to another location.
Check the feeder every day so it’s full at all times, and watch the birds snack on seeds while your strawberries bloom. Keeping a record of the different bird species that visit your garden is a great hobby for spring and summer. Start a nature journal and make friends with these wildlife animals this year!
You can also just plant an extra bush or two if you have the room and let the birds have at it. That way, there’s enough for everyone!
Plant Berries That Birds Won’t Eat
If you mainly want berry plants for their appearance and not the harvest, you can protect berries from birds by planting species they won’t eat.
Red is one of the most prominent colors in the visual spectrum of passerines, so another option is to plant berries with different colors, like blue or purple.
Porcelain berries (Ampelopsis brevipedunculata) are unique plants with pink stems and large berries. The color of the berries starts as a dark blue and fades to white or pale purple. While edible, they don’t taste good.
Other species of berries that are not popular with birds are:
- Viburnum opulus ‘Xanthocarpum’ is a cultivar with yellow-orange berries that birds will eventually eat, but only as a last resort. You can eat the fruits, but they’re sour.
- Harlequin glorybower (Clerodendrum trichotomum var. fargesii) has inedible pink berries.
- ‘Pirate King’ Barberry (Berberis x carminea ‘Pirate King’) has bright pink, edible berries.
- ‘Profusion’ Beautyberry (Callicarpa bodinieri var. giraldii ‘Profusion’) has deep purple berries that are edible, though don’t eat too many all at once.
Use Decoys and Scare Tactics
Everyone has seen those decoys like owls or scarecrows, and many of us have tried scare tactics like hanging CDs, but do they work to protect berries from birds? Scarecrows have long been associated with keeping birds out of crops, so they must have some value, right?
We know a decoy works better if it looks like a predator. One study in Oregon found that a false owl was more effective than a benign object like a box. So the type of decoy is essential.
But even when you use a decoy in the shape of a predator, birds become acclimated to it in just a few days. Studies have even found that even decoys that have moving parts aren’t enough to scare birds away long-term.
You can try other methods of mimicking nature, like placing lengths of black hose in the garden to look like snakes.
What about mirrors and other reflective surfaces like aluminum foil? These weren’t found to be effective over the long term, either, in a study by the University of Nebraska. Something like a shiny pinwheel near your berry plant can deter some birds because it moves and puts off a shiny reflection.
Switching up the location of the decoys will help. Every few days, move the decoys or reflective items.
Audio tools like wind chimes can also help temporarily, but as with decoys, birds tend to acclimate to them. Wind chimes can be placed around your garden as both an audio and visual deterrent.
There are lots of memes on social media claiming that painted rocks to look like berries can confuse and drive birds away. The theory is that the birds will try pecking the rock and learn that it’s hard and unpleasant.
Allegedly, after this experience, they won’t want to return to your garden. As with decoys, this doesn’t work in the long term. Birds quickly learn that some berries are edible, even if a few aren’t.
So, have fun painting berries if you enjoy it, but don’t expect it to protect your plants.
Article by Sarah Yule, morningchores.com
How to Clean a Chimney
Family Handyman Oct. 21, 2022
Our editors and experts handpick every product we feature. We may earn a commission from your purchases.
Regular cleaning with a shop vac and standard chimney cleaning tools will prevent dangerous creosote fires. Here’s what you need to know before you get started.
Tools Required
- Drop cloth
- Dust mask
- Flashlight
- Flue liner brush
- Long-handled brush
- Noodle brush
- Safety glasses
- Safety harness
- Shop vacuum
Materials Required
- Duct tape
- Poly sheeting
Is Fireplace Cleaning a DIY Job?
Clean creosote buildup from all parts of the chimney. Most chimney fires start in the smoke chamber/smoke shelf area, so it’s the most important area to clean (Figure A). Since that area is hard to reach in some fireplaces, check yours to see if you can reach into it and still have room to maneuver a brush. If you can’t reach it, this isn’t a DIY project.
Figure A: Chimney Cutaway

Next, see if you can access the fireplace chimney crown. If you have a very steep roof pitch or aren’t comfortable working on your roof, this isn’t a job for you. Call a certified chimney sweep. If you decide you can handle the heights, make sure to wear a safety harness.
Chimney Fires Destroy Homes
Creosote buildup may not look dangerous, but it ignites at a mere 451 degrees F, and once it starts burning, it expands like foam sealant. In less than a minute, it builds to more than 2,000 degrees F and can engulf your entire chimney and destroy your home.
Even if you clean your chimney regularly, you should still have it inspected by a qualified chimney sweep once a year. Certified chimney sweeps are trained to recognize chimney deterioration and venting problems and can assess your fireplace chimney’s condition.
Project step-by-step (5)
Step 1
Get the Right Cleaning Tools: Match the Brush To the Flue Liner
- Buy a metal bristle brush for a clay flue liner and a brush with plastic bristles for a metal liner.
- Buy enough rods to handle the entire height of your fireplace chimney.
Step 2
Get Special Brushes for the Firebox
- Buy a bendable “noodle brush” to clean the smoke shelf and a long-handled brush to clean soot off the sides of the firebox.
- Pro tip: There’s no “one-size-fits-all” brush for cleaning the flue. So you’ll have to climb up on your roof and measure the size of your flue liner.
- You’ll also need special brushes for the firebox and smoke chamber areas. Find the equipment at a home center or at an online store such as efireplacestore.com.
Step 3
Minimize the Mess: Protect Your Interior
- Lay a canvas tarp over the hearth and spread it into the room.
- Then tape poly sheeting over the fireplace and insert a shop vacuum hose.
- Seal everything with duct tape.
Step 4
Vent To the Outdoors
- Add sections to lengthen the vacuum hose, then connect it to your shop vacuum outside.
- Run the vacuum while you brush, and replace the filter when it clogs.
- Before you start brushing, protect your home’s interior from soot with poly sheeting, a canvas tarp and a shop vacuum.
- Most shop vacuum filters can’t trap all the fine soot from a fireplace, and some of it will blow right out the exhaust port.
- Pro tip: So buy extra lengths of vacuum hose and move the vacuum outside.
- Then close the doors and windows on that side of your house to prevent the soot from re-entering your home.
Step 5
The Cleaning Process: Brush the Flue
- Ram the cleaning brush up and down several times in a small section of the flue to remove chimney soot.
- Use a bright flashlight to check your work before moving on to the next section.
- Start the vacuum and begin fireplace cleaning at the top of the chimney.
- Continue adding rods and moving down the fireplace chimney until you can’t feel any more brush resistance.
- That means you’ve reached the smoke chamber and it’s time to climb down from the roof and work from inside the firebox.
- Peel back a small portion of the poly sheeting and use the long-handled brush to clean the smoke chamber.
- Use the noodle brush to remove all the soot from the smoke shelf.
- Then switch back to the long-handled brush to clean the sides of the firebox.
- Finish by vacuuming the entire firebox.
- Then fold up the poly sheeting and the canvas tarp and move them outside.
- Shake them out and reuse them the next time you clean the fireplace chimney.
Easy Fruits and Vegetables for Beginners to Grow
Bell Peppers
Bell peppers start out green, but they mature to red, orange, yellow, purple and even chocolate brown. Pick them early and they’ll still color up, but they won’t get any sweeter. Learn all about growing your own bell peppers at home.
Blackberries and Raspberries
Caneberries, such as blackberries and raspberries, provide tasty fruits for you and your family, and provide treats for birds and butterflies. Pruning is important, but nature keeps that simple, too. Learn how to grow blackberries and raspberries, including how to prune.
Cabbage
For most gardeners, summer comes too fast to grow cool-loving cabbage from seed. Even if summer arrives before you have prepared to plant cabbage seeds, you can still plant mid to late summer, and you’ll have a bountiful crop come fall. Learn all about homegrown red cabbage, including making kraut!
Cucumbers
Vining cucumbers require some space, unless you grow them in containers. Add a trellis, and your crop stays healthier and more productive. For a taste of summer, learn more about growing cucumbers, in containers and in the ground.
Garlic
Garlic can be planted in spring, but fall-planted garlic leads to bigger, better crops. Be sure garlic is treated to enough chilly weather while growing or the bulb-like heads won’t separate into cloves. Learn all about growing delicious garlic at home.
Strawberries
Strawberries are flavorful edibles that come back year after year. You can choose from many types. Some send out “runners” that root and create baby plants, increasing your patch for free. Learn how to grow your own tasty strawberries in your home garden.
Tomatoes
Whether you like big, beefy tomatoes or tiny cherry and grape types, these heat-loving tropicals are simple to grow in large decorative containers or veggie plots. Plant cages help keep them healthy and make harvests easier. Just follow these easy steps to grow your own tomatoes.
Zucchini and Squash
Plant zucchini and other squash seeds straight into your garden at the end of spring planting season. Eat soft-skinned squash when ripe; store thick-skinned squash into winter. Learn about growing zucchini and squash, including their edible blossoms.
Article from gardentech.com
Make a DIY mosquito trap
Mosquito bites are usually just an itchy annoyance, but if you are unlucky, they can also carry diseases like malaria, yellow fever and West Nile virus.
Because it is impossible to tell which mosquitoes carry diseases and which are harmless, after SHTF it’s best to assume that all mosquitoes can make you sick so it’s best to get rid of them.
You can use herbal repellents to protect yourself from mosquito bites, but it’s better to kill these insects before they can reach your property.
DIY mosquito trap
Learn how to make a DIY mosquito trap using materials you may already have in your kitchen or stockpile to protect your family from mosquito bites.
You will need:
- 2-Liter plastic soda bottle
- Adhesive tape (Such as electrical, masking, or duct tape)
- Knife
- Marker
- Ruler
Steps:
- Measure four inches from the cap of the soda bottle and use the marker to make a line around the side of the bottle.
- Carefully use a knife to cut along the marked line.
- Remove the cap and invert the top of the soda bottle, like a funnel, into the bottom of the bottle.
- Use duct tape on the edges to seal the trap.
Mosquito solution
Follow the steps below to make the solution that will attract mosquitoes to the bottle trap.
You will need:
- 1 cup of water
- 1/4 cup brown sugar
- 1/8 teaspoon yeast
Steps:
- Heat the water.
- Add the 1/4 cup of brown sugar and stir until the sugar is completely dissolved.
- Set the mixture aside. Let it cool until it is lukewarm. The sugar solution must be below 105 F because if the water is too hot, it will kill the yeast and no carbon dioxide will be produced. On the other hand, if the water is too cold, it will not activate the yeast for the mosquito solution.
- Add the yeast and stir to dissolve.
- Pour the sugar and yeast mixture into your mosquito trap.
Carbon dioxide (CO2) is crucial for the trap because mosquitoes are attracted to CO2, which humans produce lots of when they exhale. This solution also creates carbon dioxide to draw the mosquitoes into the bottle where they will eventually die.
Make sure that the gap between the entry into the trap and the solution is not too large or too small. The mosquitoes should be able to fly in and not find a large enough gap through which to escape.
Set the bottle trap outside, but a little distance away from your house. The mosquitoes will start showing up, so dispose of the solution once it has too many mosquitoes in it.
Other natural mosquito repellents
People may become prone to mosquito bites due to a combination of different factors like scent, light, heat and humidity. If you often get bitten by mosquitoes, you’re probably tired of having itchy, bumpy skin.
Different species of mosquitoes, especially the ones that carry malaria, prefer bacteria and sweat. Others are attracted to CO2 and specific hand odors.
If your family likes going camping or hiking, learn how to make natural repellents using the mosquito-repellent ingredients below. This is a safer alternative for someone with sensitive skin or children, who are more sensitive.
Citronella
Citronella is an effective essential oil against mosquitoes. Made from different herbs, it’s an ingredient used in many mosquito repellents.
When outdoors, citronella candles can provide up to 50 percent extra protection. Studies have found that the formulation of citronella is linked to how effective it is.
When the product is formulated correctly, it’s as effective as DEET and can protect you from mosquitoes for up to two hours. But if the formula isn’t right, citronella can evaporate quickly and leave you unprotected.
Lemon eucalyptus oil
Lemon eucalyptus oil is a popular natural insect repellent. The Centers for Disease Control and Prevention(CDC) has approved the use of eucalyptus oil as an ingredient in mosquito repellents.
A 2014 study revealed that a mixture of 32 percent lemon eucalyptus oil provided more than 95 percent protection against mosquitoes for at least three hours.
Make a DIY mixture with one part lemon eucalyptus oil to 10 parts sunflower oil or witch hazel. Researchers from the University of Florida have warned against using a lemon eucalyptus oil mixture on children under three years of age.
Tea tree oil
Tea tree oil, or melaleuca oil, is a popular essential oil from Australia. It has natural antiseptic, antimicrobial and anti-inflammatory properties.
Research suggests that tea tree oil is also an effective insect repellent.
Field testing revealed that repellents made with tea tree oil are effective against mosquitoes, biting midges and bush flies.
Thyme oil
Thyme oil is one of the best at protecting from malarial mosquitoes.
In an animal study, researchers reported that five percent thyme oil applied to the skin of hairless mice provided 91 percent protection against malarial mosquitoes.
You may also want to throw thyme leaves into a campfire if you’re camping or hiking. Studies have found that burning thyme leaves offers 85 percent protection for 60 to 90 minutes.
To make a DIY thyme mosquito repellent, combine four drops of thyme oil with every teaspoon of base oil, such as olive or jojoba oil.
To make a spray, add five drops of thyme oil to two ounces of water in a spray bottle. Shake well before using.
From newstarget.com
How to Deal with Poisonous Bites From Scorpions & Black Widow Spiders
Children are most at risk for these bites because adults know enough to carefully avoid such critters, but kids may be fascinated by them. And children are more likely to die from their stings or bites than adults are because risk is a matter of how much body weight there is for the poison to distribute itself through. That’s why children under 3 are likely to die from such a bite, but adults will probably recover—unless they’re over 60, which again increases the risk.
So for starters, you have to teach your children to avoid bugs with long tails, spiders, and snakes in general until they can seriously discriminate the OK ones from the bad guys.
SCORPIONS:
They live in warm-climate zones. Most of the 20 U.S. varieties are based in the Southwest, but one kind is winter-hardy and is found even in Alberta, Canada. Scorpions have long movable tails with a stinger on the end that injects poison. Scorpion poison can paralyze muscles, including the heart muscle.
BLACK WIDOW SPIDERS:
They are found throughout the United States. If you get a look at the belly, there is an hourglass shape—bright red or bright yellow—on it. If, however, all you’re seeing is the spider’s back, it’s hard to tell. Black widow poison is similar to scorpion. Florence Merrifield from Mexico wrote me, “My neighbor had 3 dogs. Two got black widow spider bit and died in ½ hour.”
First Aid for Scorpion/Black Widow Bites:
Slowest possible absorption of venom results in milder symptoms and less possibility of death. So, if possible, put ice on wound. If bite or sting is on a limb, ice the entire limb if possible. If the bite is on a limb, use a limited-tightness tourniquet, and do so carefully. You want the arteries to continue to carry blood into the area, but the veins to be inhibited from carrying blood away from it. Don’t shut off blood flow completely.
Do not give stimulants. They speed up absorption of venom. Avoid physical exertion by the victim. This also speeds up absorption. So keep the victim still rather than walking.
Don’t apply heat, chemical cauterization, herbal stimulants, or anything containing alcohol to the wound. All these speed up absorption and make the doctor’s job more difficult. Get expert medical assistance. If the identity of the stinging or biting culprit is known for sure, a doctor can give the victim an effective antivenin—unless the victim is allergic to horse serum, and many people are. If the victim is allergic, a doctor can give only supportive treatment for symptoms, and the body must deal with the venom on its own.
From The Encyclopedia of Country Living
Common Garden Pests and How to Manage Them Infographics


From homesteading.com
How to Dry Herbs from the Garden
Start out by cutting large, sturdy stems of your herb of choice. If you aren’t planning on drying them immediately, you can store them in jars of water as you would fresh flowers. The best time of day to harvest herbs is in the morning. The best time to harvest herbs during the growing season is when they are plentiful and lush — not when they are starting to wilt and have dried out from the summer heat. Some herbs grow well into the fall (sage, parsley, rosemary, thyme), so use them fresh until the frost comes and harvest those you want to dry before the first hard frost.
Step 1: Wash The Herb Stem
Carefully wash each stem by swishing it in a bowl of cool water. Allow them to air dry on a cooling rack or strainer, or by gently blotting with a soft towel.
Step 2: Weave The Twine
Carefully weave twine through the sturdiest bottom stems and the main stem. Leave a good length of string at the end.

Step 3: Hang Herbs
Hang herbs upside down in an area that is cool and dry. I prefer to hang mine in my kitchen because I’m in there every day and I don’t forget to check on them.

Article from diyprojects.com
How to Test Soil With no Equipment
All soil consists of three main layers: 20% clay, 40% silt, and 40% sand.
Once you perform the steps below your jar should ideally look like this: lay should float at the very top, with silt next, and sand at the very bottom.

To test the quality of the soil in your garden take a mason jar and fill it halfway with your garden’s soil. Fill the rest with water leaving a couple inches from the top for shaking space.
Put a lid on the jar and shake vigorously for about 5 minutes and separate the soil layers. Let it stand untouched for about 1 day until you are able to see 3 clear distinct layers.
How to read your loam soil test results:
The bottom layer will be sand. This layer will be rocky and heavy.
The middle layer will be silt.
And the top will be clay.
If the soil is about 30% clay, 40% silt, and 40% sand, then your soil is perfect quality! Keep it up!
How to balance your soil:
If your soil is about 10% clay, 70% silt and 20% sand, your soil is called Silty Soil. This can be improved by adding more organic matter.
If your soil is about 30% clay, 60% silt and 10% sand, you have Silty Clay Soil. Do not add more sand, but improve by watering your soil more and exposing it to more water.
If your soil is 15% clay, 20% silt, and 65% sand, your soil is called Sandy Soil. This can be improved by adding more organic matter.
Organic matter in soil such as compost, or manure is able to be spotted as your soil will be darker than normally. Garden mulch is also a great solution. Adding a thick layer every spring is great.


How to Turn an Old Washing Machine Drum Into a Fire Pit
Transform what otherwise would be trash into an outdoor treasure. Start with a tossed-out washing machine drum, which you can pick up at an appliance repair shop or scrap yard.
There comes a time when things break down and need replacing. Well instead of tossing the washing machine that failed after many years of use, I decided to turn it into a fire pit.
If you don’t have an old washer, you can always check your local scrap yard and pick one up.
What You’ll Need:
- 1 old washing machine
- Gloves, safety glasses. Proper PPE
- Socket set
- Wrench set or a couple of adjustable wrenches
- High Temp spray paint (any color)
Remove the Drum:
Not all washers are the same but they are all held together with nuts and bolts. Figure out the proper size socket or wrench needed to remove the drum from the washer casing. Remove the main outer casing of the washing machine. Your machine may have a plastic housing around the drum.
Remove the bolts from the bottom and then slip the plastic off of the drum.
Cleaning and Painting
Next, clean the inside and outside of the drum using soap and water. Once dried it’s time to paint! Use a high-temperature black paint that I picked up from my local hardware store. Any color of paint will work and allows for your own unique flair.

Once the paint is dry you can add legs to the bottom or leave it as is.
It can be slightly buried in the ground or set on a flat stone or rock bed.
How to Make DIY Seed Tape and Use It to Sow Seeds
Seed tape is a strip of sticky fabric or cloth that holds the seeds at your preferred distance apart. This enables you to place your seeds where you want them without the frustration of dealing with sticky, tiny, or difficult-to-handle seeds.
Here is a list of seed tape materials:
- All-purpose flour
- Water
- Scissors
- Toilet paper
- Marker or pen
- Measuring tape
- Chopstick
- Seeds
Mark the Spacing
Next, you should find your seed packet. On every label, there is a section that tells you how much to “thin to” or how far to space the seeds. Use the pen or marker to mark out the spaces where you will place each seed.
Mix Flour and Water
Mix 2.5 tsp of flour and 1 tsp of water. The mixture shouldn’t be too runny or too thick. Once you feel it thickening up, stop mixing. After the paste is ready you can dip the chopstick in it and dab the liquid on the toilet paper at each mark that you made previously.
Place the Seeds
Finally, place the seeds onto the flour and water paste. Then, fold the toilet paper over the seeds and press down gently. Write down the name of the seeds so you don’t forget what you’ve got.
Leave the seed tape to dry for a few hours to make sure that the paste turns solid. Plant within a few days.
To store, you can wrap the tape around a piece of cardboard.
Using seed tape isn’t much different than planting seeds the old-fashioned way. First, prep the area where your plants will grow. Ensure that the soil is at the right pH, has the proper drainage and texture, and contains the correct nutrients.
Follow the planting instructions for depth, dig a trench, and place the tape in there with your seeds. Cover the whole thing with soil. Make sure to place the next strip at an appropriate distance away. You don’t want to crowd the strips.
Labeling is key. There’s nothing worse than putting down a strip of seeds, only to forget what you’ve planted.
Don’t forget to water as needed. It’s best to water with a fine spray rather than a stream or you risk displacing the seeds after the tape dissolves.
Article from morningchores.com
HOW TO PERMANENTLY KILL GRASS AND WEEDS WITHOUT PESTICIDES
There are many ways to kill grass and weeds. Killing them permanently, however is quite difficult. To kill any kind of grass or weed permanently you need to attack and kill the plant’s roots.
If you are trying to kill a large area of vegetation an easy way to start is covering the area with cardboard or wet newspaper to smother it. Depriving the grass and weeds of light and fresh air will kill the plants and make it easier to dig up their roots.
Another equally effective method to kill weeds is to spread salt directly onto the weeds or unwanted grass that come up between patio bricks or blocks.
Vinegar and dish
soap will also work and you can make a homemade weed killer out of these cheap ingredients.
INGREDIENTS
- 1 quart of vinegar
- 2 cups of Epsom salt
- ¼ cup dish detergent
- Spray bottle
VINEGAR
Use the cheapest kind of vinegar you can get. Look in the cleaning aisle of the grocery store for vinegar made for cleaning and not cooking. It’s usually cheaper. Ordinary distilled white vinegar with 5% acidity is cheap and works great. If you can find a higher acidity even up to 20%, it is going to work faster, but the end results will be the same so don’t stress if you can’t find it.
SALT
Epsom salt is great for this homemade weed killer recipe but regular cheap salt works just as well. Just cheap iodized or un-iodized generic salt also known as sodium chloride are fine.
DISHWASHING LIQUID
You only need a few drops of dishwashing liquid so the brand doesn’t matter. The purpose of the soap is to break the surface tension of the vinegar so it sticks to the weeds, forcing them to absorb it more readily.
DIRECTIONS
- Heat p in a pan on the stove until it is hot, but not boiling.
- Add Epsom Salt and stir in with a wisk until it is dissolved. Let mixture cool slightly so that it is still warm but cool enough to handle.
- Add Dawn Dish Soap to your sprayer and slowly pour in the vinegar mixture.
Pick a hot, dry day and spray weeds until saturated, they will wilt and shrivel up within hours. Use caution not to spray any plants or flowers you want to live.
The vinegar will not harm the soil and you can safely replant the area once the weeds have died.
HOW HOMEMADE WEED KILLER WORKS
The vinegar draws moisture out of the plant, killing it in the process. Spray during the hottest part of the day and make sure there isn’t rain in the forecast for at least 24-48 hrs.
This homemade weed killer recipe is not only cheap, but is completely non-toxic to humans and animals.
Some of the weeds may need a second application later to completely kill them off, but most of them will be dead and gone after several days.
DO YOU HAVE TO PULL WEEDS AFTER SPRAYING?
You will see results in a day or two after spraying. After the grass and weeds die, you’ll have remove them by hand, which is difficult, but much easier than pulling a live weed.
How to Wash Strawberries
As a result of the copious amount of pesticides needed to grow strawberries off-season, strawberries have earned the number #1 spot in EWG’s Dirty Dozen (The top 12 most highly-contaminated fruits and vegetables).
So What’s The Best Way to Remove all of Those Pesticides from Fresh Strawberries?
According to the USDA, using any type of detergent may cause the produce to absorb trace amounts of it. This means you shouldn’t wash your produce with anything you wouldn’t feel safe eating! Strawberries have soft, moist flesh that readily absorbs moisture – so applying a soapy residue could conceivably result in you eating whatever it is you wash them in. No studies have been conducted (that we are aware of) that can either confirm or deny this claim, and you’re free to wash them in whatever you would like. If you do choose to use a detergent, we would urge you to wash them quickly to reduce the amount of time the soap is in contact with your strawberries.
When Should You Wash your Strawberries?
Wash strawberries as close to use as possible. No matter what method you use to wash strawberries, they will spoil faster once they’ve been washed.
How to Store your Unwashed Strawberries
The method that kept strawberries freshest longest was to seal them up in glass canning jars. -but any glass, airtight storage container will work fine.
If your strawberries are damp or wet, either pat them dry or add some paper towels to the bottom of the container. Just fill them up, seal them, and put them into the fridge just like that – don’t wash them until you’re ready to use them! If your strawberries are fresh, they should last 2-3 weeks using this method.
Washing Strawberries with a Salt and Vinegar Bath
We learned above that salt water can deliver a double-whammy in removing pesticide residue, and that vinegar is effective at breaking down dirt and killing bacteria. Below we will explain how to properly wash your strawberries using both salt and vinegar – but feel free to omit one or the other if you would like.
Strawberry Bath Ingredients:
- Fresh Strawberries
- A bowl large enough to hold the strawberries
- Salt (iodized, sea salt, any edible salt will do)
- Distilled White Vinegar (Apple Cider Vinegar works as well. Don’t use cleaning vinegar)
- Water (tap is fine)
Prepare the Salt and Vinegar Bath:
In your bowl, for every 3 cups of (room temperature) water, add 1 cup of vinegar and 3 tbsp of salt. Swish it around and let sit until the salt dissolves. After 5 minutes, gently transfer the strawberries into a colander and vigorously rinse them under running tap water. This step will remove any remaining soil, salt and vinegar.
From howtocleanstuff.net
Make a Suitcase Dog Bed
From MaxandFodder website
Materials:
- Vintage Suitcase (hard shell)
- Tools (hammer, screwdriver, extreme muscle strength)
- Pillow
- Pillow Sham
Directions:
- Open the suitcase and examine how it is hinged together.
- If it is screwed together, then you just need to unscrew the top half of the suitcase from the bottom half. If it is attached by some other means, then you will have to break out the hammer. Joey and I purchased the strongest suitcase known to mankind. It was machined together to sustain extreme wear, so disassembling the top from the bottom of the suitcase was quite a feat. Luckily, Joey provided the “extreme muscle strength” from the materials list. He used the hammer and his brawn to break the top from the bottom.
- Discard the top half of the suitcase.
- Cover a pillow with the sham of your choice. I used a sham from our old ikea duvet cover.
- Place the pillow in the suitcase and tuck the corners in. We lucked out because our suitcase was the perfect size for the pillow we used. If this is not the case, you can make your own custom pillow.

How to Remove Superglue from Skin
You Will Need:
- Acetone nail polish remover
- Hand soap
- Warm water
- Hand lotion
Steps to Remove the Glue:
- First, do NOT try to pull the fingers apart once the glue has cured. This will result in ripping the skin and unnecessary pain.
- Fill a small bowl or cup with acetone nail polish remover.
- Dip your fingers or affected skin into the remover.
- Allow it to set for several minutes while the acetone breaks the bond of the glue.
- When the glue starts to loosen, gently roll the fingers back and forth until the bond breaks and the glue is released.
- Take your time, rushing the process will only result in painful tears of the skin.
- Once the glue is removed, wash your hands with soap and water.
- Nail polish remover is very drying to the skin. Apply a quality hand lotion to restore the moisture.
Additional Tips and Advice
- If no nail polish remover is available, soak the hands in soapy, warm water. It may take longer, but the glue will begin to loosen over time. Once it begins to loosen, rub the fingers back and forth, but do NOT pull them apart. Continue rolling until the glue is released.
From the How to Clean Stuff website
How to make antibacterial cleaning wipes
From The Typical Mom blog
- Thick paper towels
- Bleach
- Distilled water
- Tea tree oil
- Wipe container
Cut paper towels
Use a serrated knife to cut thick paper towel roll in half.

Mix ingredients
In another bowl mix 2 tbsp. bleach, 2 cups distilled water and 3 drops tea tree oil. Then pour this over the cut paper towels so it can absorb.
Soak
Allow paper towels to absorb as much liquid as possible, then remove the middle piece of cardboard.

Package
Put roll of soaked paper towels into a leftover store-bought wipes container and pour liquid left in a bowl over the top. Seal container so they stay moist and don’t evaporate.

Spring Cleaning Checklist
From the How to Clean Stuff website
Throughout the House
- Vacuum/Wipe Down Walls and Ceilings: Start by vacuuming with the upholstery wand to remove as much loose dirt and dust as possible. Follow this with a soft cloth and soapy water to clean really dirty areas. (Squeeze out the cloth each time so it’s only damp, not dripping.)
- Furniture: Vacuum and clean upholstered items and polish wooden items. Remove all dust on furniture and treat any problem areas (tears, nicks/scratches, rust spots, loose parts, etc.) It’s also a good idea to move the couch out so you can vacuum behind/underneath it.
- Dust: Choose a quality duster that will trap and remove the dust (ex: microfiber cloth) rather than just spread it around. Dust all surfaces of your home including shelves, knickknacks, lamp shades, door trim, window casings, the tops of picture frames, and ceiling fans.
- Air Vents: Clean these yourself (here’s a guide on how) or have them professionally cleaned.
- Baseboards: Dust and wipe down baseboards.
- Vacuum: Vacuum everywhere, including all floors and other areas that can quickly be dusted/cleaned with vacuum attachments. Don’t forget to vacuum behind doors that often remain open and underneath items that can’t be moved, such as beds. Do this after dusting the other areas of your home so any loose dust that fell to the floor is picked up.
- Shampoo Carpets and Rugs: Pretreat stained areas and then clean the entire area with a quality rug steam cleaner. These are available to rent from a variety of stores; call your local hardware store or visit the RugDoctor website for some suggestions in your area. If you have valuable/antique rugs, consult a professional before cleaning.
- Windows: Clean the windows inside and out. Grab a friend or spouse to help make the job go quicker. Once clean, open the windows to be sure they are in good working order and to air out the house for a couple hours while you clean. Check that all screens are secure and patch any holes you find.
- Drapes/Blinds/Window Treatments: Clean the drapes and blinds. If heavy winter drapes are used, remove, clean and store them. Replace with lighter warm weather window treatments.
Kitchen
- Defrost and clean out the freezer: For more info, see our guide How to Clean a Freezer.
- Refrigerator Coils: Pull out the refrigerator and clean the coils. Be sure to unplug the refrigerator first to avoid any shocks. The coils are usually at the bottom under the grill or in the back. Simply vacuum away any dust or dirt buildup with a vacuum wand.
- Refrigerator: Remove all contents, throw out any suspicious condiments, and wipe down all shelves. Wash the drawers if needed, but be sure to fully dry them before replacing them in the fridge.
- Pantry: Go through the pantry and check all expiration dates, especially those on items that are used for a long time like spices.
- Wooden Cabinets: Keep your wooden cabinets looking great by cleaning them with equal parts white vinegar and water with a teaspoon of olive oil mixed in. The oil is especially important to keep the wood supple. Use a soft cloth to wipe them with the cleaner. For added shine and deep conditioning, wipe them with plain olive oil a little olive oil on a cloth, then use a dry cloth to remove any excess oil from the surface.
- Trash Cans: Wash out and sanitize your trash cans to keep them smelling fresh during the winter months.
- Oven/Stove Cleaning: In addition to cleaning the inside of the oven, look at the exhaust vents. Clean the grease traps and vents as well. Pull the oven out and clean behind the unit to remove excess dust and debris that has dropped/dripped down over the months.
- Drains: Remove buildup and odor-causing growth with a quality drain cleaner. There are also a variety of chemical-free options, such as baking soda and vinegar (sprikle a generous amount of baking soda down the drain, then pour in some white vinegar), or simply pour some boiling water down (a teapot works well for this).
Bathrooms
- Check Expiration Dates: Sort through cosmetics and prescriptions, and discard all expired products. Many products have a symbol that looks like an open can of tuna with a number next to it (usually either a 6 or 12). This symbol tells you how long a product can remain on your shelf after is has been opened (the number equals months, e.g. 6 months, 12 months, etc.). Use that symbol as additional criteria for determining which products stay.
- Check Grout in Tile: The grout in tile can wear and become porous. Regrout areas that are weak or damaged. This is very easy to do. Simply pick up a box of grout powder in a matching color from your local hardware store, mix a little with some water in a bowl to make a thick paste, then wipe the grout over the lines. Wipe a damp cloth over the line or surrounding tile afterwards to remove any excess, then allow the grout to dry. This also works well for covering any stains on the grout that are tough to remove.
Bedrooms
- Flip the Mattress: To keep even wear on your mattress, it’s wise to flip it periodically. Spring cleaning is the perfect time!
- Swap the Bedding: Now that warmer temperatures are here, remove the flannel sheets and heavy blankets, wash them and store them. Replace them with lighter, warm weather bedding.
- Pillows: With use, pillows can house bacteria and mold. If your pillows are machine washable, wash them and dry them completely. If they’re not washable, leaving them out in the sun for a day is a good way to freshen them and kill bacteria. Be sure to flip them so both sides get sun.
- Clean out Drawers and Closets: Remove every item and put it into one of three piles: discard, donate, and keep. Any winter clothing that was not worn this year is a prime candidate for donation. Move cold weather clothing to the back/sides of closets and put warm weather clothing in the front.
- Smoke Detectors/Alarms: Replace batteries in all smoke detector units.
Home Office
- Organize Files: Use this time to check policy dates and get rid of excess paperwork. Scan and store important documents on your computer to save space.
- Book Shelves: Vacuum the tops of the books first with the wand, then wipe down any exposed shelf area. Consider donating any books you have not picked up or thought about in the last couple years.
- Utensils: Test all pens, highlighters, and other writing utensils to be sure they work. Replace any items that are found defective as soon as possible so you have them when needed.
- Computer: Dust your keyboard, mouse laser, and speakers with a paintbrush or compressed air. Check that all CPU fans are clear of dust as well and clean as needed (do not vacuum them!). Here is a guide to help.
- Mousepad: Wash your mousepad with some soapy water, then hang it to dry. Be sure it has fully dried before putting it back on your desk.
Garage
- Outdoor Trash Cans: Wash out and disinfect trash cans to keep odors and pests away.
- Furnace Filters: Time to replace or clean the filter for your furnace. This is also important to keep your furnace running efficiently.
Basement/Attic
- Minimize: Sort through boxes of stored items and clothing. Donate, sell or trash items as appropriate.
- Sort and Organize: Use bins or boxes to keep like items together in an organized fashion so you can find them easily. Where possible, always label the boxes with details of what’s inside. To prevent writing directly on the plastic bin, put several lines of masking tape on the side to write on instead.
- Safety: Keep all appliances raised up off the floor to prevent any electrical problems should there be water in the basement.
Outdoors
- Light Fixtures: Check for burnt out bulbs, broken fixtures or damaged wires. Replace and repair as needed.
- Outdoor Furniture: Bring your outdoor furniture out of storage and clean it well so it’s ready for that first spring BBQ.
- Walkways: Clean all decks and walkways to remove any mildew that may have developed.
- Porch: Sweep away any cobwebs or nests. Wash down the walls.
- Siding: Clean any areas of the siding that are weathered or stained.
- Gutters: Check that gutters are free of any leaves or debris so they can take on the April showers without issue.
Laundry Room
- Washing Machine: Clean out your washing machine. Here is a guide to help.
- Dryer: Vacuum out the lint trap the dryer and if you use dryer sheets, wash the lint screen thoroughly to remove residue. Clean the vents and exhaust as well, which is especially important to prevent a fire. Here is a guide to help with cleaning the dryer vent.
How to Fix a Leaky Toilet
The following is an excerpt from ‘If I Had a Hammer’ by Andrea Ridout (HarperCollins Publishers, 2008). No matter your DIY needs and no matter whether you’re a DIY novice or expert, home improvement guru Andrea Ridout has ideas, advice and expertise to share with you in her book. This excerpt is from Chapter 3, “Beautiful Bathroom Boosts.”
One of the most common toilet problems is excess overflow. This often happens because the water level in the tank is not balanced correctly. The water level should be a half inch or less below the overflow tube. When the water level in the tank rises above the overflow tube, the water will run into the toilet bowl constantly. When the level is too low, the toilet may not flush fully. Luckily, both problems are easily fixed with a screwdriver and a little know-how.

1. Determine the flushing mechanism. Most toilets have one of three different types of flushing mechanisms: a float arm, a float cup or a metered fill valve. A float arm looks like a balloon on the end of a metal rod, the rod part being the “arm.” Usually, the float is made of black rubber, but it can be made of other materials as well. A float cup has the float part wrapped around the refill pipe rather than on the end of a metal arm. A metered fill valve is found on older commodes and does not use a float to control the water level in the tank.
2. Adjust the float arm, the float cup or the metered fill valve.
- Float arm: Adjust the level of the float. If the arm is metal, you can bend it either up or down to raise or lower the float. On plastic arms and some metal arms, there will be a knob at the ball cock where the arm meets the vertical pipe that supplies water back into the tank. Be sure the float rests halfway in the water. If it is covered by water, the float has a leak in it and needs to be replaced.
- Float cup: A float cup has its float situated on the intake pipe instead of on the end of a metal arm. To adjust the level of a float cup, find the metal clip that holds the cup in place along the refill pipe and squeeze it. Move the cup to the desired level and release the clip.
- Metered fill valve: If you have a metered fill valve, I recommend upgrading the flushing mechanism to a float cup or float arm to help minimize problems. If that is not an option right now, take a flathead screwdriver and turn the screwdriver and turn the screw found on the fill valve clockwise to raise the water level, counterclockwise to lower it.
3. Adjust the water level. Check the level of water in the tank, which should be a half an inch or less below the overflow tube (see diagram). Adjust the water level up or down accordingly, and flush to check that the level is balanced and roughly half an inch below the top of the overflow rube. Repeat until you get it right.
Know Your Limitations
Even though I have made many repairs to plumbing fittings, I limit myself to repairs outside the walls. To repair joints, valves or drains inside the wall, I call a plumber to do the plumbing part and then make the wall repairs myself.
Many good plumbers will make every effort to save your walls, but sometimes a little destruction is needed to access the problem. In such cases, drywall repair is preferable to tile repair, because removing tile can require a whole new shopping experience. Sometimes, it’s best to access the problem from the other side of a tile wall, even if it destroys the wall in a bedroom or closet. You may even consider making the drywall opening into an access panel for later repairs, especially if it’s in a closet, under the countertop or inside a cabinet. In many homes, a tile wall backs up to an exterior brick wall, leaving no easy access. Some deck sub faucets and whirlpools don’t have access panels because they were built before recent code changes required them.
How To Use Pine Cones In The Garden
If you have a few evergreen trees in your yard, pine cones may seem like more of a nuisance than a gift. But pine cones are a free renewable resource with plenty of applications in the garden. Collecting them provides yet another ingenious way to garden for free.
1. Make Pine Cone Mulch
In the natural environment, pine cones are tasked with distributing the conifer tree’s seeds; they open their scales to release the seeds during dry periods and close up again when wet.
They can persist on the ground for years to repeat their reproductive cycle again and again. In the garden, this means they can be used as incredibly long lasting mulch that will take ages to decompose. They are also naturally resistant to mold and fungus.
You can mulch with pine cones by keeping them whole. Or you can break them up by processing them with a wood chipper or by running them over with a lawnmower.
2. Add Pine Cones To Your Compost Pile
Pine cones are also an excellent source of carbon (or “browns”) in the compost heap. They are primarily composed of ash, lignans, and tannins, and once fully broken down, will add these beneficial elements to your finished hummus.
Although its slow degradation is great for mulch, in the compost pile you will want to hasten the process by chopping them into smaller pieces first. The smaller the better so for the quickest composting results, use a chipper or shredder to create a very fine, sawdust like consistency before adding it to the pile.
3. Build A Ladybug Hotel

Building a bug hotel is a great way to encourage ladybugs and other insects to stick around. While there are all sorts of scavenged materials you can use to give them a place to nest and hibernate – such as hollow reeds, branches, leaves, bark, and holes drilled in logs – pine cones are an excellent place for lady bugs to settle overwinter.
You can provide them a pine cone room in a multi insect abode. For a quick, ladybug dedicated fix, this DIY requires only chicken wire or netting, twine, and several pine cones; hang it near your garden in a sheltered area that is protected from heavy rain.
4. Craft A Pine Cone Bird Feeder

Any pine cone will do but a large, round, and wide one will provide the best surface area. Remove a few of the pine cone’s scales to make some extra space for food. Slather the pine cone in peanut butter or suet and then roll it in your favorite birdseed mix. Tie it with twine or a decorative ribbon and hang from the bough of a tree.
5. Use Pine Cones As A Container Filler

Large, deep planters can take bag after bag of soil to fill to the top. Not only is it expensive, most plant roots won’t reach the bottom of the pot so it’s also quite unnecessary.
While plastic bottles, rocks, and tin cans are some of the container filler options available to use, pine cones have a few advantages over these types of materials.
Firstly, pine cones are light and won’t add extra weight to your pot if you need to move it. Second, pine cones are slow to decompose and will surely add bulk for the entire season.
And lastly, when pine cones do break down, they add beneficial nutrients to the soil and won’t leach out chemicals like plastics or metals would.
When using pine cones to fill your containers, place them so they take up about one third of the space at the bottom of the pot.
Article from Natural Living Ideas
How to Grow Potatoes in a Barrel
Learn how to grow potatoes in a barrel with these step-by-step instructions for creating and using a potato barrel. If you have a sunny spot to place a garbage can, you can grow your potatoes!

- Start in spring. Potatoes take all season to fully mature, so begin this project around your average last frost date (which you can find out from your county extension agent).
- Select the spuds. They grow from chunks of last year’s crop — chunks with an “eye,” or rootlet, are referred to as “seed potatoes.” Each “eye” produces a cluster of new tubers. You can find countless potato varieties in nurseries and online, and you can use any one you want, but small to medium-size ones work best in a barrel. Be sure to get certified disease-free seed potatoes, because they can suffer from nasty problems like scab.
- Pick a barrel. Plain or fancy, it’s your call. Gardening catalogs and Web sites offer barrels specifically designed for growing potatoes. But they are mostly about being more attractive — not functionally better — than one you make at home out of a whiskey barrel or a common trash can. If your container has been used before, be sure to scrub it out well to get rid of fungi that might cause your potatoes to rot before you harvest them.
- Drill for drainage. If the barrel doesn’t already have holes in it where excess water can drain out quickly, drill a few in the bottom and in the sides close to the bottom. Quarter- to half-inch holes are big enough.
- Give it a lift. Set the barrel in a sunny spot and get it up on blocks or bricks so it sits a few inches above the ground and air can circulate around it.
- Add the soil mix. Make up a soil mix by blending three parts of compost with two parts of peat moss. Fill the bottom of your barrel six inches deep with the mix. Dampen the mix.
- Plant your spuds. Place the seed potatoes a couple inches apart in the soil mix. Keep the mix moist but never soggy (which can cause the potatoes to rot).
- Cover after sprouting. In a week or so the seed potatoes will have sprouts about six to eight inches tall. Add more soil mix to cover them up to their bottom leaves. Again, keep the mix moist, but not soggy. Repeat the process of allowing the sprouts to grow, adding more soil to cover the sprouts and moistening the soil until the barrel is filled to the top.
- Keep the moisture constant. Remember to keep the soil damp but not wet. Feed the plants with liquid fish and seaweed fertilizer (available at nurseries and home centers) weekly or biweekly until you see little white or yellow flowers on the vines, which indicate that the new potatoes have begun forming.
- Dig for buried treasure. At the end of the growing season, the vines turn yellow and die back. The potatoes are fully grown. Carefully tip the barrel over, and sift through the soil for the potatoes. Brush the dirt off them (don’t wash them until you’re ready to cook them), and store them in a cool, dry place away from direct sunlight.
From The City Homesteader
How to Plant a Grape Vine
Find a sunny spot in your yard. All types of grapes need full sun, which is considered 6 to 8 hours of direct sunlight per day.
Make sure it’s an area where you don’t regularly use lawn chemicals. Grape vines are susceptible to damage from many common broadleaf herbicides, such as 2,4-D, dicamba and others.
Plant grapes in early spring when they are dormant to help them put their energy into developing a strong root system. You can buy bare root grapes (with no soil attached) or container pots. If you’re planting bare roots, soak the roots for a few hours prior to planting.
Dig a deep hole to accommodate roots of bare root plants. You want to stretch the roots out vertically in the hole. For container plants, set them in the hole about the same level as they are in the pot, says Pilarchik. If planting more than one vine, plant them about 6 to 8 feet apart in the row.
Grapes aren’t heavy feeders. You can mix compost or a handful of a balanced organic granular fertilizer into the hole if you like, however.
Add the plant and backfill the soil, tamping down firmly. Spread a handful of fertilizer on top of the soil about a foot or two away from the vine. Water well, then regularly for the first season, especially during dry spells.
How to Clip Black Nails on a Dog
Cut your dog’s nails once they touch the ground.If you can hear their nails tip-tapping on the floor, it’s time for a pedicure. Or, hold up the paw and look at it from the side. If the nail extends past the pad for that toe, it could use a trim.
- Long nails make your dog prone to health problems. Overgrown nails push the foot into an unnatural position, causing harmful changes to your dog’s posture and gait. Your dog may suffer from orthopedic issues, arthritis, and torn nails if their nails aren’t trimmed regularly.
Black nails are harder to trim because you can’t see the ‘quick’, or the vein that runs through the wider part of the nail. There are a couple of good ways to accomplish trimming without hitting the quick:
Use a Flashlight
Using a small flashlight or your phone light, extend your pup’s nails directly over the light. Hold the nail between your thumb and pointer finger where the nail curves. Look for a dark mass inside the nail. If your pet’s nails are thin enough, you’ll see the quick as a shadowed area. My dogs’ nails aren’t thin enough, so I opt for the next method…

Find the Groove
Examine the underside of your dog’s nail; notice how the thickest part of the nail is closest to the paw, with the nail thinning and hooking towards the tip. Look for a grooved, hollow triangular area close to where the hook begins. This hollow segment of the nail tip can be safely trimmed; the quick begins above it.
How To Install a Sink Faucet
Replacing a sink faucet is fairly easy. Start by turning off the water at the supplies under the sink. Open the hot and cold taps on the faucet to relieve the pressure. Use a cup to collect the water from the supply lines as you disconnect them. If you are replacing the water supply lines too, then disconnect them from the supply valves. Otherwise, disconnect the supply lines from the faucet beneath the sink. If you have enough room to work, you can use slip joint pliers, but a basin wrench may make the job a lot easier.

With the basin wrench remove the mounting nuts that secure the faucet body to the sink. If they will not loosen, spray them with penetrating oil and give the oil a chance to work.
If replacing a bathroom sink, disconnect the drain lift rod from the drain pop-up assembly. The two most common styles require loosening a thumbscrew or squeezing a metal tension band to release the lift rod.
You should now be able to remove the faucet body, although the old putty may have a hold on it. If so, carefully run a putty knife around and under the faucet to break the bond. Lift off the old faucet and clean the surface of the sink before mounting the new faucet.
Wrap the male threaded fittings with PTFE tape or pipe dope to improve the seal.
Your new faucet may come with a mounting gasket or the instructions may direct you to create a base using plumbers putty. If directed to use putty, roll out a length of putty between your hands, about 1/8″ in diameter and long enough for the entire perimeter of the base of the new faucet. Apply the putty gently to the base and then place the faucet into position on the sink. Gently rock the faucet to create a bond between the faucet and the sink. Make sure the faucet is level and there are no gaps in the putty. Gently scrape away any excess putty.
From beneath the sink, slide the washers (if any) onto the faucet and fasten the lock nuts securely. Do not over tighten the lock nuts.
Now connect the water supply lines. You may be able to use the old supply lines or you may need to install new ones. We like the flexible, braided stainless steel supply lines because they are very easy to work with. Professional plumbers often use rigid tubing because it is cheaper. However, at a plumbers hourly rate, if he spends just five minutes cutting and bending tubing, it already is costing more than flexible tubing.
Screw the supply line connection to the faucet, making sure that you connect cold-to-cold and hot-to-hot. Insert the drain lift rod and connect it to drain pop-up assembly. Test the lift rod to make sure it seals and opens properly.
Remove the aerator so that any debris in the water lines can be flushed out. Turn on the water supply valves and then turn on the faucet for a few seconds. Replace the aerator and then inspect the connections for leaks.
(From Acme How To)
Homemade Carpet Deodorizer
This DIY carpet deodorizer offers a simple way to make your home smell fresh and inviting. Choose your favorite essential oil and let the baking soda do the rest.
Materials
- Complementary herbs (optional)
- 30 to 40 drops Essential oils of choice
- 1 cup Baking soda
Instructions
- If you’re using herbs, pick those that complement your essential oils. Try dried lavender, rosemary, peppermint, or citrus rinds. Whatever you choose, grind them in an old coffee grinder or blender.
- Combine herbs, baking soda, and essential oils in your container, and shake thoroughly to combine. Let sit overnight.
- When you’re ready to use, sprinkle the deodorizer lightly over the carpet from your container or with a spoon. Allow to sit for 15 minutes, then vacuum up.
- Note: Check your vacuum manufacturer’s instructions to ensure that baking soda won’t harm the machine.
How to Seal Drafty Windows and Doors
Reduce your heating and air conditioning bills by sealing drafty windows and doors. Latex caulk is often used for this application because it expands more than silicone caulk. Load the tube into a ratchet rod caulk gun.

After you have removed the old caulk with caulk remover and/or scraping, clean the area with vinegar, bleach, or liquid caulk remover, and let it dry. You may want to tape off the area to avoid getting unwanted caulk on the walls. Once you’re ready, use scissors or a utility knife to cut the tip of the caulk tube at a 45-degree angle. Use the trigger on the caulk gun to apply a thin line of caulk. Run your gloved finger over the line to smooth it. Let dry for 24 hours.
How to Freeze Fruits and Vegetables
- Choose produce that’s ripe and unblemished.
- Before freezing vegetables, blanch and shock vegetables by boiling them briefly, drain, then plunge into ice water. Dry thoroughly. Why blanch and shock? Blanching prevents enzymes from damaging color, flavor, and nutrients. Blanching also destroys microorganisms that might be lingering on the surface of produce.
- Freeze fruits and vegetables quickly by spreading them in a single layer on a rimmed sheet pan.
- When the produce is frozen solid, store in air-tight containers or freezer bags. Fill hard-sided containers to the top and remove as much air as possible from freezer bags. Be sure to date the packages.
- Fruits and vegetables freeze best at 0 degrees F or colder.
Special Instructions for Fruit:
- Wash fruits and set aside damaged fruit. Some fruits freeze best with a sugar or sugar-syrup preparation. Blueberries, currants, and cranberries do fine without sugar.
- To freeze delicate berries like strawberries or raspberries: Arrange them in a single layer on a baking sheet. Once frozen, transfer to a plastic freezer bag or container. You can also prepare delicate berries with sugar or sugar syrup.
- For fruits that tend to brown, like apples, peaches, nectarines and apricots, treat with ascorbic acid (Vitamin C). Look for the powdered form in health food stores, drugstores, and some grocery stores in the vitamin aisle. To make an ascorbic acid wash: Dissolve 1/2 teaspoon of ascorbic acid powder (or finely crushed vitamin C tablets) in 3 tablespoons water. Sprinkle this mixture over the cut fruit. An acceptable substitute: Slice the fruit and dip the slices in an acidulated water bath — about one quart water plus a tablespoon of lemon juice — before drying and freezing.
Ways To Start A Fire Without Matches Or A Lighter
- Flint & Steel
- A Glass Lens
- Friction
These and other methods are covered in this article by this camping website:
How to make homemade butter
Homemade butter tastes so wonderful, and so different than store bought butter- even all natural health food store butter. This project takes around 20 minutes. Before you start, you will need a stand mixer (if you try with a hand-held your arm will fall off before it’s over), lots of paper towels, a spatula, a container for the butter and a container for the buttermilk. That’s right- buttermilk, better than any I’ve ever tasted from the store. In fact, I think the buttermilk from the store is gross! I only use it in baking, never for drinking.
To begin, you will need one quart of fresh cream. I buy Hildebrand Farms because it contains no antibiotics, which are given to each and every assembly line cow and which are also causing humans who consume milk and meat containing them to build a resistance to antibiotics. Hildebrand Farms cream also contains no Bovine Growth Hormones, also known as BGH, which is given to each and every commercially raised cow so that they produce more milk and meat than God intended. By the way, I am convinced this substance is what is causing our young men to grow to over six feet tall these days and our young women to be so voluptuous at such young ages. Okay, down from my soapbox now, moving on…
Mix your cream on the highest speed. You will need either an attachment for your mixer to keep the cream from splattering, or as in my case, paper towels draped over the machine. You will reach stage one: whipped cream. Stage two: a little thicker than whipped cream. Scrape the sides now and then so that all the cream is involved in the process! Stage three: Starting to look more like cottage cheese. Scrape the sides! Stage four: We have butter, albeit wet butter!
Now I know your hands are already clean, so just reach in, grab a handful and squeeze! So fun ![]() After squeezing out all the liquid you can, smash down gently on a lint-free paper towel or cloth to remove the last remaining moisture.
After squeezing out all the liquid you can, smash down gently on a lint-free paper towel or cloth to remove the last remaining moisture.
I have a beautiful butter pot to store my butter in, but you can use whatever you have on hand. Just make sure it has a lid and store in the fridge unless it’s really cool in your kitchen (and if it’s that cool in your kitchen, I’m jealous!)
If you like light, fluffy, whipped butter you can throw it back into the (now clean) mixer and whip it up. You can also add salt and/or seasonings if you want. Start out with 1/4 teaspoon sea salt and add more, a tiny bit at a time, depending on your preference.
Now, time to strain your buttermilk into something with a tightly fitting lid and store in the fridge of course, if you have enough left to store after you taste it.
How to Make Almond Milk (Graphic)

How to Fortify Your Home Against Intruders
You must be able to protect your family and property from those who wish to do you harm. This means getting firearms, learning how to use them and securing your property to keep out trespassers.
While setting up a seven-foot wall fence around your property may seem like a good idea, this can make your home a target for potential looters. Having a giant fence makes it harder for someone to trespass on your property, but it is also one of the most obvious signs that you have things worth stealing.
If you want to build a fence to protect your home and property, try to make it look as innocent as possible. Settle for a sturdy chain link or a tall wooden fence.
When SHTF, you can add barbed wire or spikes on the top to prevent trespassers from scaling the fence.
Alternatively, you can use your lawn to your advantage by landscaping defensively. This means planting shrubs and trees strategically to provide shade and give you more privacy.
Take note that people might use your plants to conceal themselves so you need to be smart with your landscaping. When planting hedges and trees, make sure they won’t block your view of potential intruders.
Choose defensive plants with a lot of protective thorns and prickles. These can help deal damage to anyone attempting to break into your home.
Here are some of the best defensive plants to grow around your property:
- Bougainvillea
- Century plant
- Firethorn
- Spanish bayonet
- Tomato porcupine
Don’t forget to improve your door security by installing sturdy deadbolt locks and using longer set screws for door hinges and strike plates. If possible, install door jammers so you can buy more time in case of an attempted break-in.
As for windows, you can secure them with security film. Plant cacti or thorny bushes beneath first-floor windows to keep out trespassers.
How to Make Homemade Peanut Butter
You will need-
- 3 cups dry roasted & salted or unsalted peanuts
- sea salt, to taste, (if using unsalted peanuts)
Place the peanuts in a medium food processor. (Note: Use a 7-cup food processor. If yours is much larger, you may want to increase the amount of peanuts so that there’s enough quantity to blend well.) Process until very smooth, stopping every 30 seconds to 1 minute to scape down the sides of the bowl, as necessary, and to give the food processor’s motor a break. The mixture will be chunky at first. Then, it’ll thicken into a ball, and finally, it will become creamy and smooth. The whole process should take about 8 to 10 minutes. Makes about one cup.
How to do CPR
Before starting CPR, follow these steps:
- After ensuring a safe scene, loudly ask the person if they’re OK.
- Call 911 if you see someone collapse. The 911 dispatcher can guide you through the steps to take until paramedics arrive.
- Ask someone nearby to get an automated external defibrillator (AED).
- Tilt the person’s head back while they’re lying on their back.
- Listen for 10 seconds to see if you hear the person breathing.
- Check to see if the person is breathing or to see if their chest is going up and down.
- Check for a pulse by feeling the side of their neck.
- Perform CPR if you don’t feel a pulse.
Performing CPR:
- If the person isn’t breathing, put one of your hands over the other and place them in the middle of the person’s chest (right under their nipples).
- Putting the force of your body weight behind it, push your hands down hard in the middle of the person’s chest. Use the heel of your hand, or the part just before your wrist. Keep your arms straight.
- Keep pushing on the person’s chest (called doing compressions) 100 to 120 times per minute, pushing down 2 inches each time. Make sure you allow their chest to come all the way back up between compressions.
- People who have CPR training can pause compressions to give the person two mouth-to-mouth rescue breaths for every 30 compressions (about 20 seconds or so).
- Keep doing chest compressions and giving rescue breaths in a cycle until the person revives or more help arrives.
Perform the rescue breath as follows:
- Pinch the person’s nose closed while tilting their head back a little and their chin up.
- Close your mouth over theirs and blow a breath into it so their chest goes up. If the person’s chest doesn’t come up, check to see if there’s something in their mouth.
- Give a total of two breaths and go back to doing compressions.
While you’re doing CPR, someone should be bringing an AED to use for help with resuscitating the person.
You can do CPR even if you don’t have training in how to perform CPR. If a teen or adult is in cardiac arrest, call 911 and do chest compressions until emergency help arrives. This is called “hands-only CPR.” By distributing oxygen currently in the person’s body, it can help someone in cardiac arrest until someone with CPR training arrives.
It can be easier to remember the CPR compression rate if you follow the beat of “Stayin’ Alive” by the Bee Gees
If you’re doing CPR on an infant as a single rescuer, put one hand on their forehead to keep their head slightly back to provide proper rescue breaths. Use two fingers of your other hand to do compressions that go a third or half the depth of their chest. The number of compressions and breaths is the same as for adults.
If you’re a two-person rescue team, while one person provides rescue breaths, the other person should use a two-hand method. Place both thumbs in the center of the chest (below the nipple) with the remaining fingers wrapped around the sides of the infant. Deliver compressions with the two thumbs. Use the same number of compressions and breaths as for adults.
Easily Create Drinking Water in an Emergency
Sourcing clean drinking water is perhaps the single most important skill needed in a survival situation. Unfortunately, natural water sources are not always hygienic and can harbor parasites, viruses, and bacteria. You can create potable water in the wild with a few simple techniques that you can easily practice at home.
The easiest way to purify water in the wild is to boil it, but you may be left with sediment or other particulate matter that affects the taste. Filter the water through a t-shirt, or build a filtration system using charcoal from your fire, sand, and small river rocks inside an upside-down PET bottle. (If you have no way to start a fire, see the article & link above ‘How to start a Fire Without Matches or a Lighter’
If you cannot find a source of water, you can practice drawing water from the earth by building a solar still. A solar still consists of a hole approximately two feet across by one foot deep. Place a container at the bottom and cover the hole with a tarp or plastic sheet, sealing the edges with dirt or sand. Place a small rock in the center of the cover, and moisture will condense on the underside of the cover and rip into the container.
How to Grow Sprouts

1 | Rinse and then soak the beans or seeds overnight (or for several hours during the day).
Be sure that all seeds or beans are covered with water. This usually means keeping at least two inches of water above the sprouting material. Be sure to use filtered water for soaking.
2 | Drain the water and place the beans or seeds gently into a clean mason jar.
Cover the jar with the lid or cloth/screen. Lay the jar on its side and distribute the seeds or beans along the bottom so that they are not too stacked on each other.
Also, keep the opening of the jar unblocked so that there is plenty of space for air to flow in and out. It is best to put the jar on a cookie sheet or some other portable, flat surface since some water will remain from the soaking.
3 | Place the jar in a very dark place or cover with a dark cloth.
Allow the beans or seeds to germinate for 1-2 days in the dark at about room temperature. Rinse and redistribute the beans or seeds 2-3 times a day.
4 | If you are sprouting beans, that is all you do! For seeds, remove the dark covering and allow them to grow in filtered light.
Depending on the seeds, the remaining germination time could range from between 1 to 10 extra days. Remember to continue to rinse and drain 2-3 times a day during this period as well. When the seed sprouts are from 1/8 inch to 2 inches long, your seeds are ready to eat!
My husband’s site ♥️


Visual Verse of the Day

"Behold, to the LORD your God belong heaven & the highest heavens, the earth and all that is in it.” Deut. 10:14

